What’s new M24 for VMware Cloud on AWS

VMware Cloud on AWS BU have been pretty active this last quarter and after the release of M22 which came with lots of cool new features like certificate authentication for IPSec VPN or IPV6, it’s time to welcome M24!

This version has been released on the 14th of November 2023 and comes with lots of interesting new features that are going to be GA (Generally Available) for all brand new SDDC. Let’s have a look at what M24 offers.

Networking

SDDC Group to Group connectivity

SDDC Groups are an organization-level construct that can interconnect multiple SDDCs together with high bandwidth connectivity through a construct called Transit ConnectTM (which falls under the responsibility of VMware).

So far it was used to provide a highly performant, scalable and easy to use connectivity from SDDCs to SDDCs or from SDDCs to native VPCs or AWS Transit Gateway.

With the release of M24, it is now possible to interconnect multiple SDDC Groups in the same Organization together. This will permits the connectivity not only between SDDC group members but also between members in different groups.

In addition, interconnected SDDC Groups can leverage their existing external connections to a Direct Connect Gateway and/or a AWS VPC and a Transit Gateways.

This can highly benefits customers who has split their SDDCs deployment based on region or business purpose. The SDDC Group to Group connectivity can be enabled through the same SDDC Group UI.
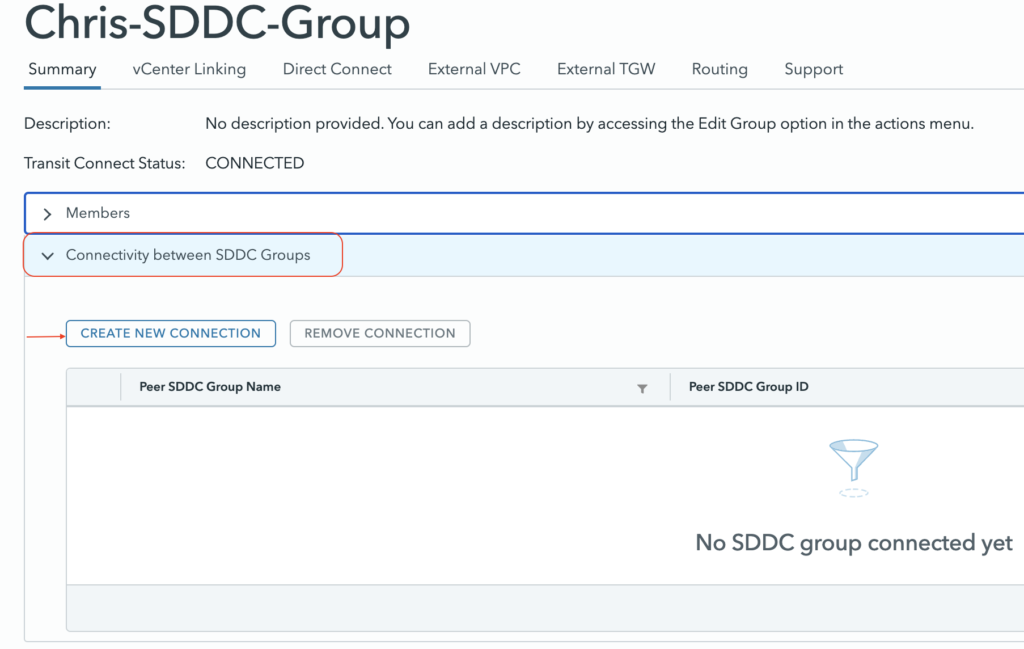
Just pick an SDDC Group that has at least one SDDC deployed in it and it will interconnect the groups.
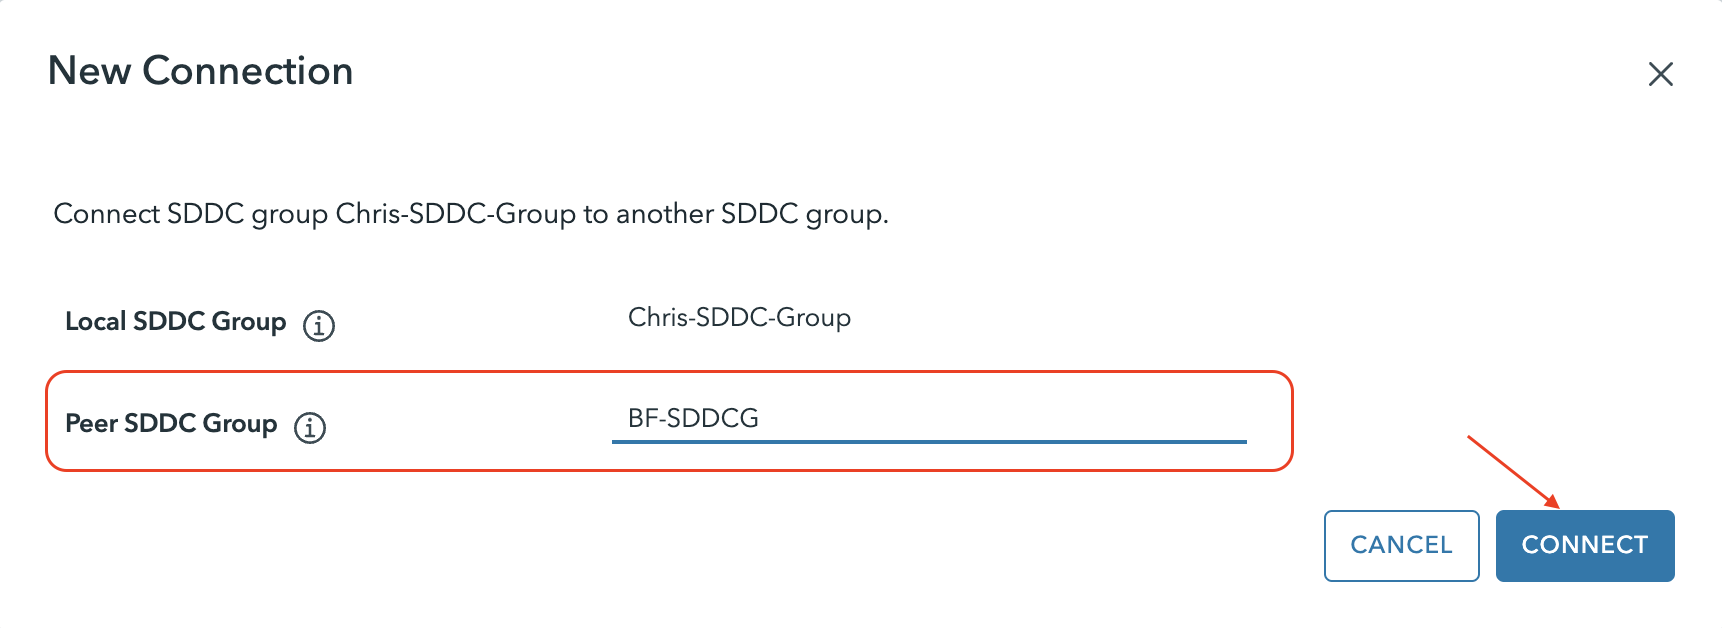
The process automatically peers the groups together.
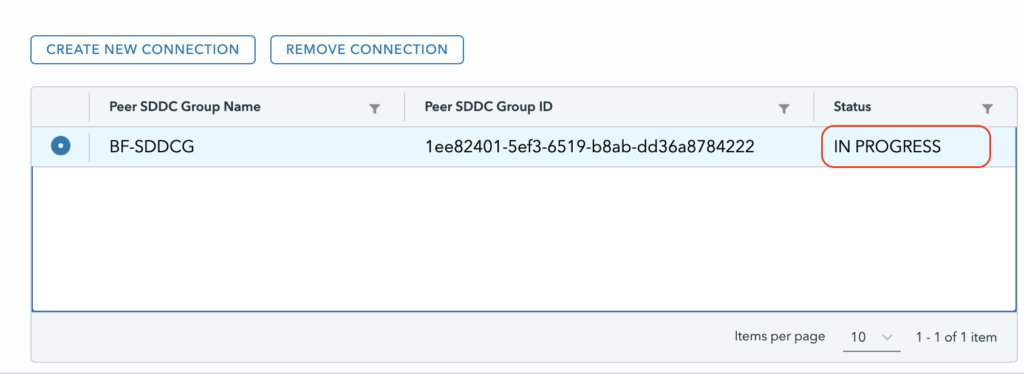
After a couple of minutes it will appear as connected.

NSX Alarms

The new M24 release comes with a new version of NSX equal to 4.1.2. This new version of NSX introduces some new alarm definitions like “Connectivity to LDAP server Lost” which is important when using it for Identity FW rules, or when the IDPS engine has a high memory usage.
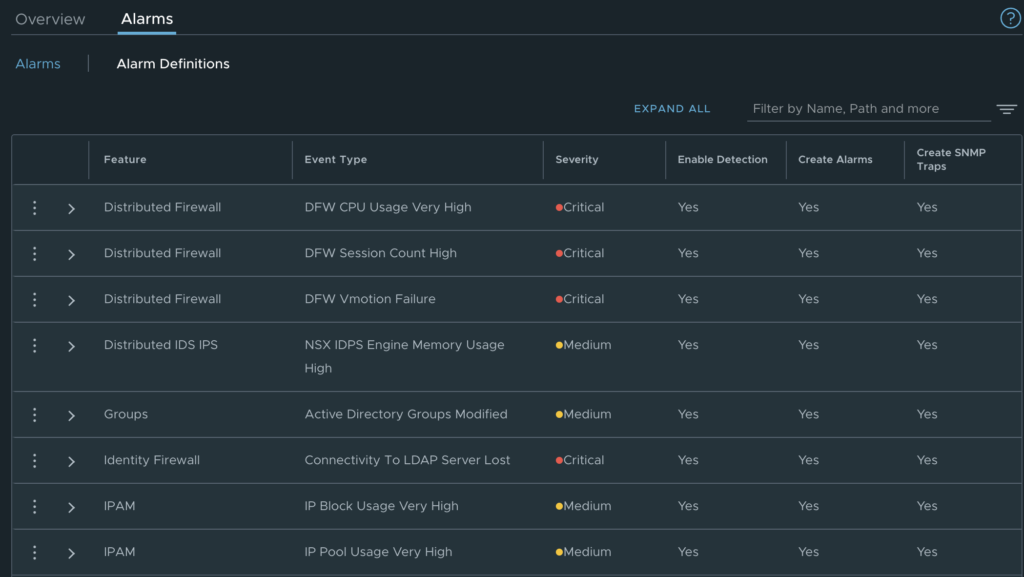
These alarms are automatically triggered each time a corresponding event happens.

NSX new roles

VMware Cloud on AWS will come with 4 new NSX roles in addition to the existing ones providing a greater level of granularity when accessing certain features in NSX Manager.

The 4 new roles are NSX Security Admin, NSX Security Auditor, NSX Network Admin, NSX Network Auditor. The two new Security roles allows for managing the DFW rules and Advanced Security features independently from the other features in a VMware Cloud on AWS SDDC.

The new roles can be selected when creating a new user in the Org under the User and Access Management UI from the VMware Cloud Services Console.

The Security Auditor role will allow users specific Read-only access to the Security configuration objects on the NSX Manager UI.

For a complete view on the privileges for the new roles have a look at this NSX-T documentation page that list the NSX roles and permissions.

Please note that for VMware Cloud on AWS, you cannot clone or create new role and you must rely on the existing roles.

IPV6 support for management

Fore those who didn’t know we have had early availability to IPv6 for east-west traffic only for customers who were requesting it.

Later on IPv6 support has been announced in GA with version M22. In this version, it can not only be activated on segments connected inside the SDDC but also for North-South traffic via Direct Connect and Transit Connect as well as for DFW IPv6 traffic including Layer-7 App-ID. This permits also to create or migrate IPv6 workloads for DC migration or extension use cases.

IPv6 support for East/west and north/South traffic.

IPv6 support for East/west in standard and custom T1 GW and for North/South traffic over a Transit Connect.

With M24, we are enhancing again IPv6 support and introduce the support of IPv6 for the management components such as vCenter, NSC manager or HCX using SRE-configured NAT64 FW rules. If you require communication with IPv6 to SDDC management appliances, contact Customer Success Manager or your account representative.

Enabling IPv6 in an SDDC is quite simple, it requires to select the option from the Actions Menu in the SDDC Summary page. This sets up the SDDC for dual stack networking.

Each SDDC has to be enabled for IPv6 support and once it has enabled it cannot be disabled.

Storage

vSAN Express Storage Architecture

vSAN Express Storage Architecture (ESA) is providing a true evolution in the way storage is managed within an SDDC and it will replace the previous Original Storage Architecture (OSA).

vSAN ESA have been initially released with vSphere 8.0 in October last year. ESA available today on the VMware Cloud on AWS M24 version is the third iteration of ESA.

ESA comes with a lot of features that are going to optimize both the performance and the space efficiency of the storage used in each VMC SDDC and his supported on the new i4i.metal instance for new SDDCs.

Features

vSAN ESA is providing performance and compression increase with more predictable I/O latencies by leveraging a single tier HCI architecture model where each NVMe storage devices serves reads and writes.

It provides the following:

  • Native snapshots: Native snapshots are built into the vSAN ESA file system. These snapshots cause minimal performance impact even when the snapshot chain is deep. This leads to faster backups.
  • Erasure Coding without compromising performance: A highly efficient Erasure Coding code path allows a high-performance and space-efficient storage policy. 
  • Improved compression: vSAN ESA has advanced compression capabilities that can bring up to 4x better compression. Compression is performed before data is sent across the vSAN network, providing better bandwidth usage.
  • Expanded usable storage potential: vSAN ESA consists of a single-tier architecture with all devices contributing to capacity. This flat storage pool removes the need for disk groups with caching devices.
  • Increased number of VM’s per host in vSAN ESA clusters: vSAN 8.0 Update 2 supports up to 500 VMs per host VM on vSAN ESA clusters, provided the underlying hardware infrastructure can support it. Now you can leverage NVMe-based high performance hardware platforms optimized for the latest generation of CPUs with high core densities, and consolidate more VMs per host.
  • vSAN ESA support for encryption deep rekey. vSAN clusters using data-at-rest encryption have the ability to perform a deep rekey operation. A deep rekey decrypts the data that has been encrypted and stored on a vSAN cluster using the old encryption key, and re-encrypts the data using newly issued encryption keys prior to storing it on the vSAN cluster.
  • Always-On TRIM/UNMAP. ESA supports this space reclamation technique natively and helps release storage capacity that have been consumed by Guest OS and aren’t used anymore.

Benefits

vSAN ESA provides :

  • 2,5X more performance at no additional costs
  • 14 to 16% more storage capacity for a better TCO when sizing VMware Cloud on AWS SDDCs
  • TRIM/UNMAP enabled by default to recover from released storage capacity

The vSAN ESA RAID-5 and RAID-6 deliver a better performance over vSAN OSA RAID-1 without having to consume twice the capacity of storage. ESA Managed Storage Policy supports RAID-5 starting from 3 hosts to deliver better storage capacity for smaller clusters. The gain is estimated at 35% for the same cost!

Requirements

ESA is in Initial Availability (AI) and is available on demand on SDDC version 1.24 or later with i4i.metal instances deployed on a single AZ cluster (standard cluster only).

To enable the feature customers require assistance from the Customer Success team.

vSAN ESA is only available for greenfield SDDC (today).

VPC Peering for External Storage

This is one of the most exciting news of all. VMware Managed Transit Gateway is not needed anymore to mount NFS datastore in ESXi hosts. For those who are using a single AZ SDDC, a VPC Peering will be sufficient and there will be no additional cost for that connectivity.

Customers will be able to attach an Amazon FSx for NetApp ONTAP file systems directly to their ESXi over a VPC Peering. This works by establishing a peering connection exclusively for the NFS storage traffic between the shadow VPC managed by VMware and the AWS native VPC.

It is important to note the native VPC where the FSX service is going to be provisioned can be in the same AWS Account as the one where the Connected VPC used to deploy the SDDC is.

To create the VPC Peering, customers need to contact their Customer Success Manager or Account representative. Based on the information provided (SDDC ID, ORG ID, AWS ACCOUNT ID) VMware SRE will initiate the VPC peering request from the Shadow VPC to the customer VPC. The customer will. have to connect to the AWS console and accept the request to finish the process.

After the VPC Peering has been established, the NFS mounting is possible over the VMC Console by following the same process involved with a Transit Connect, see my blog post here.

Increased NFS Performance

With the release of M24, the MTU of the VMK0 interface (VMkernel) has been increased to 8500. This is going to increase the performance for the large block throughput by up to 20% when using external NFS datastore like VMware Cloud Flex Storage or FSX for Net App ONTAP.

Conclusion

VMware is constantly adding new features to its VMware Cloud on AWS platform to address the constant needs of our customers for security, performance and cost optimization.

VMware Cloud on AWS M24 release is really providing a bunch of nice features and I hope this will help you to better succeed in your cloud migration project.
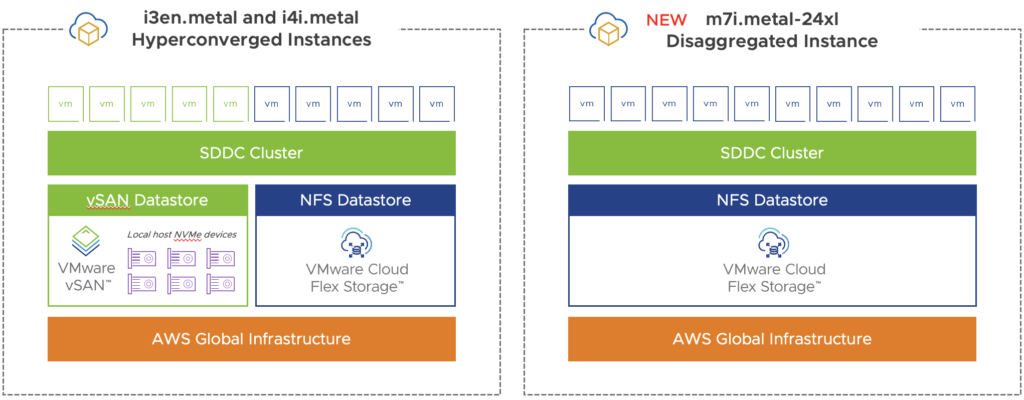
New instance type: M7i with disaggregated storage for VMware Cloud on AWS

This next-generation architecture for VMware Cloud on AWS enabled by an Amazon EC2 M7i bare-metal diskless instance featuring a custom 4th Gen Intel Xeon processor is really bringing a lot of value to our customers. As they combined this instance with scalable and flexible storage options, it will enable them to better match application and infrastructure requirements.

Since the launch of VMware Cloud on AWS, we have been releasing only two additional type of instances: i3en.metal and i4i.metal. The i3en instance type is suited for data-intensive workloads both for storage-bound and general-purpose type of clusters. The i4i.metal released in August last year is a new generation of instances that supports memory bound and general purpose workloads like databases, VDI or mission-critical workloads.

We are proud to announce the release of a new disaggregated instance option to support new innovative use cases like Artificial Intelligence (AI) and Machine Learning (ML):

With this announcement, customers will soon have the option to choose between three instance types, which include i3en.metal, i4i.metal and m7i.metal-24xl.

M7i Use Cases

Traditionally, we have offered to extend the SDDC storage capacity by adding an additional number of hosts which was not the best in term of cost optimization. In addition we have seen customers willing to add compute for certain use case or business needs without having to add more storage.

As AI (Artificial Intelligence) and ML (Machine Learning) use cases have also become crucial to businesses, driving insights, automation, and innovation, the need for specialized solutions tailored to AI/ML workloads becomes a reality. This kind of applications generates and processes vast amounts of data, requiring performant, reliable, and scalable storage architectures as well as a performant and reliable modern compute.

With the release of this new Amazon EC2 M7i instance type, we offer the capacity to scale the storage elastically and independently from the compute capacity. This will allow more flexibility in controlling the compute and storage resources.

The M7i instance itself doesn’t come with any storage and an external storage solution like VMware Cloud Flex Storage (that we announced last year) must be configured for planning the capacity of the clusters. This permits to size the storage for the real needs and avoid wasting resources and paying for unused or redundant capacity.

The other innovation coming with the m7i.metal instance is the Advanced Matrix Extensions accelerator which accelerates matrix multiplication operations for deep learning (DL) inference and training workloads.

With the solution, customers will be able to build a cost-effective infrastructure solutions and find the right balance between the storage and compute resources.

Some of the key use cases of m7i.metal-24xl instance are:

  • CPU Intensive workloads
  • AI/ML Workloads
  • Workloads with limited resource requirements
  • Ransomware & Disaster Recovery

M7i instances are ideal for application servers and secondary databases, gaming servers, CPU-based machine learning (ML), and video streaming applications.

M7i features characteristics

The M7i.metal-24xl instance type is fueled with the 4th Generation of Intel Xeon scalable processors called Sapphire Rapids with an all-core turbo frequency up to 3.9 GHz. This new generation of Intel processors feature Intel® Accelerator Engines designed to accelerate performance across the fastest-growing workloads.

Intel Processor with Advanced Matrix Extensions (Intel® AMX) accelerator can deliver significant out-of -the-box performance improvements and accelerate matrix multiplication operations for deep learning (DL) inference and training workloads (with virtual hardware 20 thanks to VMC 1.24)

It offers:

It also supports always-on memory encryption using Intel Total Memory Encryption (TME)!

Both VMware Cloud Flex Storage and Amazon FSx for NetApp ONTAP are supported by M7i.metal instance and offers NFS datastores for the ESXi hosts. The size of the datastore can be tailored for the needs of applications.

The M7i.metal instances can be deployed only in Standard clusters (one AZ). Stretched clusters will be supported in further version of VMC.

In a single SDDC, you will be able to mix two different type of clusters, meaning one with M7i instances, and one with i4i.metal.

When you create a new cluster, a dedicated management datastore of 100 TiB of logical capacity is going to be deployed to store the management plane (vCenter, NSX appliances and other appliances for integrated services like HCX or VMware Recovery).

M7i customer benefits

This new instance type comes with a number of new benefits four the customers:

  • Better TCO: certain use cases like Ransomware and DR requires a limited amount of compute, memory and storage, m7i.metal instance help build a more cost effective pilot light option with smaller resource configuration,
  • Accelerated Performance: thanks to the Intel AMX, you can experience significant improvements for end to end data science workloads and AI models execution.
  • Enhanced Scalability: provide a more flexible and scalable storage options with a storage-disaggregated instance type for customers on VMware Cloud on AWS that helps them scale storage independently from compute.
  • Great Flexibility: customers can now choose between three instance types (i3en.metal, i4i.metal, m7i.metal-24xl) and different storage options to better align the infrastructure to their compute/storage needs.

This next-generation architecture for VMware Cloud on AWS enabled by an Amazon EC2 M7i bare-metal diskless instance is really bringing a lot of value to our customers. The combination of this instance with scalable and flexible storage options will help them better match application and infrastructure requirements.

If you want to know more about it and learn how it can deployed, I invite you to have a look to this video.

See you int he next Blog post!

Leveraging NFS Storage in VMware Cloud on AWS – Part 2 (Flex Storage)

In my latest post, I have covered how to supplement a VMware Cloud on AWS SDDC deployment with Amazon FSxTM for NetApp ONTAP.

In this blog post, I am going to present the similar option delivered by VMware called Cloud Flex Storage.

Overview of Cloud Flex Storage

Cloud Flex Storage is a natively integrated cloud storage service for VMware Cloud on AWS that is entirely delivered, managed and maintain by VMware.

The solution delivers a performant, scalable, natively integrated and cost effective solution for VMware Cloud on AWS use cases where storage and compute scaling need to be independent.

Firstly, it uses a native cloud storage solution that has been developed and delivered for years with robust capability and that relies on a scale-out immutable log structured filesystem. Secondly, it is the same technology that backs VMware Cloud Disaster Recovery.

In term of consumption model, customers can consume the service on-demand or through a 1-year or 3-years subscription with a minimum charge of 25 TiB per filesystem. Secondly they can add storage capacity in 1 TiB increments to a subscription. Pricing includes production support.

Architecture model of Flex Storage

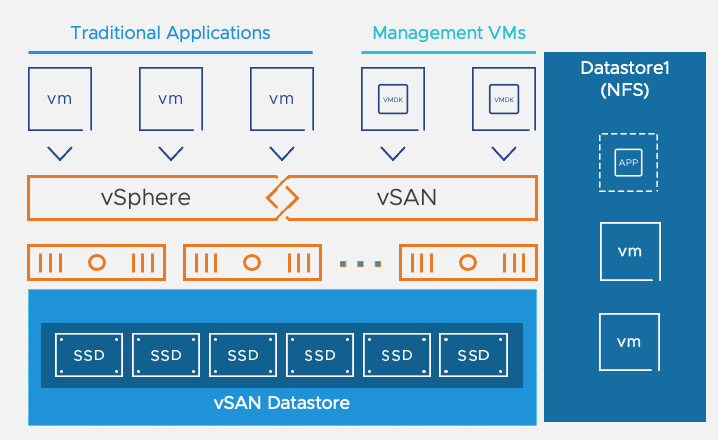
Architecturally, VMware Flex Storage is providing a standard NFS Datastore to SDDC Clusters for production workloads.

This scale-out datastore file system consists of a two-tier design model that enables to scale storage performance and capacity independently. The first tier is using NVMe disks that seats in front to offer an optimized large read cache tier. Backend controller nodes in HA Pair are supplementing the NVMe cache. The front end cache serves all reads and can deliver up to 300K IOPS per datastore (this is the peak read IOPS with at least 4 hosts).

The second tier comprises a Cloud Object Storage function based on Amazon S3 for low-cost object storage that seats behind the scene to provide elastic capacity.

You can deploy up to six Flex Storage datastores allowing for up to 2.4 petabytes of storage capacity in a single region. A maximum limit of (1) datastore can be presented to a single SDDC. That datastore can be connected to all clusters in the SDDC after being created.

You can independently provision up to ~400 TiB of usable storage capacity per datastore to VMware Cloud on AWS hosts. Moreover, the storage capacity is highly redundant across multiple AZs and is presented as an NFS datastore to the clusters. A single datastore can support up to 1000 powered on VMDKs. For current limits, it’s always preferable to check the configuration maximum Tool here.

Since version 1.22 of VMware Cloud on AWS each client can leverage multiple TCP/IP connection to NFS datastore with the support of nConnect in NFS v3. These connections are used on a round-robin basis and allow each vSphere host to increase the per datastore throughput (up to 1 GB/s).

Most importantly, any application can use transparently each Flex Storage datastore which are automatically mounted as an NFS datastore.

What kind of Workloads can benefits from Flex? Storage

In the version 1.0 of the service, Cloud Flex Storage is targeting the capacity heavy workloads where the performance needs are not as extreme as what a standard vSAN datastore can offer.

So it’s probably not recommended to use it for the highest transactional Databases but any tier 2 apps will benefits from it. When I say Tier 2, I mean lesser than mission critical system and also with lesser performance than Tier 1.

This includes for example:

  • Virtualized file servers
  • Backup Repositories
  • Database archives
  • Data warehouses
  • Powered off VMs

It is important to note that a single Virtual Machine can leverage both VSAN and Flex Storage for storage needs.

Data you copy on Flex Storage is encrypted at rest and you can use the same data protection tools used for vSAN based storage like VMware SRM or vCDR (there are certain limitations in topologies supported). Customers can have both Flex Storage and vCDR services in the same organization as long as the deployments are in different regions.

When doing cloud migration with HCX, it’s recommended to first land the VMs into the VSAN datastore and move them to Flex Storage NFS datastore afterwards.

In term of region support, the service is currently available in 17 different regions across Americas, Europe, Africa, and Asia Pacific including the following:

The current list of supported regions can be found here.

What are the benefits of Cloud Flex Storage?

The solution offers multiple benefits:

  • Scalability and Elasticity: it offers to scale the storage capacity on-demand without having to deploy an additional host.
  • Simplified operations: it can be deployed and use through the CSP console and it is natively integrated in the VMware Cloud on AWS service.
  • Optimized Costs: the service is using a simple pricing model based on $/GiB consumed and it offers a discount for commitment. There are no extra costs for things like transit or caching the data.

Deployment Process of Flex Storage

In order to deploy Flex Storage, first of all you need to ask for access to the service. Once you have access to the Flex Storage service you will have to chose a purchase option : on-demand, 1-year or 3-years subscription.

When you create a subscription, you will choose a subscription Region. It is best to select a region that covers the region where you have deployed SDDCs. Prior to activating a Region make sure the region you activate is the location where VMware Cloud Flex Storage is deployed and where you want to create datastores.

Create an IP Token

Next thing to do is to create an API token to authorize your organization’s access to the service.

For that you need first to login to the Cloud Service Portal and Select MyAccount> API Tokens. Generate a new token with the relevant privileges. Make sure the user that is creating the Token has Org owner role.

The API Token must meet the following requirements:

  • Org owner role
  • VMware Cloud on AWS roles: Administrator and NSX Cloud Admin
  • at least one VMware Cloud Flex storage role

Once you have created the API Token you must add it to the Cloud Flex Storage UI.

Create a datastore

In order to create a new datastore you have to login to the Cloud Service Portal and Select Cloud Flex Storage tile.

From the left menu, Select Summary, and Click on CREATE DATASTORE.

Select the SDDC where you want to mount the datastore. You can select only the SDDCs that exists in the same region where the datastore was created. In my case, I have an SDDC with an already existing datastore so I can’t create a new one.

In the Create Datastore dialog box, you will pick the SDDC where you want to attach the datastore. The datastore will be created in the same AZ as the selected SDDC.

Next you have to give a name to your datastore and confirm you will be charged for the minimum 25 TiB of capacity. Launch the creation by typing CREATE DATASTORE.

Mounting the datastore in VMware Cloud on AWS

You can mount a datastore to a Cluster in VMware Cloud on AWS from the Cloud Flex Storage UI.

From the left navigation, select Datastores, and pick the datastore you want to mount.

From the Actions menu, Select Mount to Cluster.

Select a cluster and Click OK.

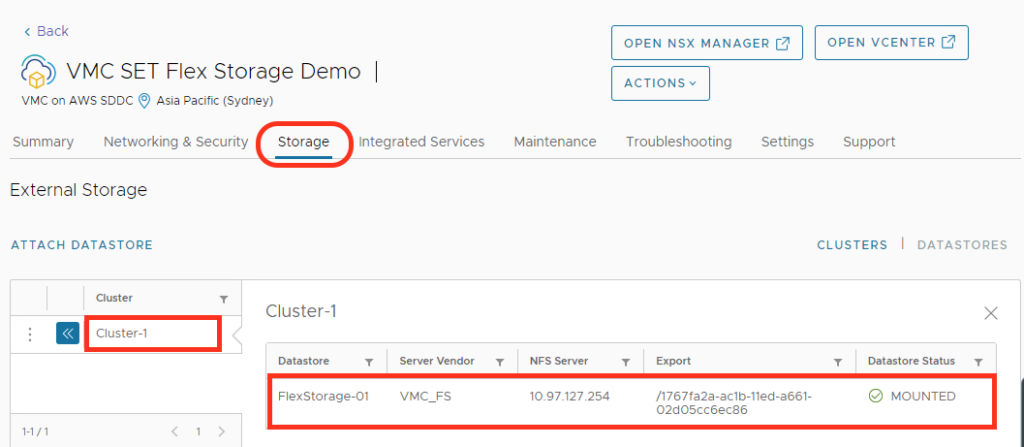
You can check the details of your datastore in VMware Cloud on AWD SDDCs from the VMware Cloud console. Select your datastore, and then click the Open in VMware Cloud button.

in VMware Cloud on AWS, select the Storage tab for the SDDC and then select the Datastores sub-tab.

Conclusion

Flex Storage is a managed service that provides NFS external storage to VMware Cloud on AWS. It provides the ability to scale storage separately than by adding host to the SDDC. By providing external NFS storage it is now possible to scale storage independently from compute and memory. With the VMware Cloud Flex storage solution, VMware can provide up to 400TiB of usable capacity per datastore.

Cloud Flex Storage is not a new technology as it is based on the same technology that has been used for VMware Cloud Disaster Recovery.

The scale out file datastore consists of a very large cacher tier for best performance with HA controllers to provide high availability, non destructive upgrade and offer 99,9% SLA, and object storage for elastic capacity at low cost.

Flex storage offers a very nice option to scale storage independently from compute with a solution that is easy to deploy and use.

Leveraging NFS storage in VMware Cloud on AWS – Part 1 (FSx for NetApp)

VMware Cloud on AWS relies on vSAN Storage, VMware’s software-defined storage solution, for all data storage requirements. vSAN provides a distributed storage within each cluster in the SDDC which size depends on the instance model.

By default, each vSAN clusters in an SDDC expose two datastores that are usable to store both management VMs (exclusively used by VMware) and Production workloads.

Traditionally, the cluster storage capacity (and data redundancy) scale with the number of nodes in the SDDC. However, there are certain scenarios that require additional storage but not the associated cost of adding additional compute nodes. With these ‘storage-heavy’ scenarios, a more optimal TCO can be met by reducing the number of hosts while leveraging an external cloud storage solution.

There are currently two options to add an external NFS storage to a VMware Cloud on AWS SDDC cluster:

VMware Cloud on AWS support adding external storage starting with version 1.20. A the time of this writing, adding an external storage is only supported with Standard (non-stretched) Clusters.

In this blog post I am going to cover the first option.

FSx for NetApp ONTAP solution

FSx for NetApp ONTAP is a variant of the already existing Amazon FSxTM based on the NetApp ONTAP storage operating system.

The solution itself offers the capability to launch and run a fully managed ONTAP file systems in the AWS Cloud. This file system offers a high-performance SSD file storage (with sub-millisecond latency) that can be used by many OS like Windows or Linux.

One big advantages in the context of VMware Cloud on AWS is that it fully supports the existing NetApp SnapMirror replication solution to easily replicate or migrate existing on-premises data from ONTAP deployments to the AWS Cloud. It also supports the FexClone feature which allows for instantaneously creating a clone of the volumes in your file system.

Multiple protocol are supported to access the Filesystem like NFS, SMB or iSCSI (for shared block storage). Using it as a new datastore to VMware Cloud on AWS requires to use the NFS protocol.

Each filesystem is delivered with two tiers of storage: primary storage (with SSD levels of performance) and capacity pool storage (using a fully elastic storage that scale to petabytes) with automated tiering to reduce costs.

Each FSx file system can offer multiple GB/s of throughput and hundreds of thousands of IOPS.

By default, a file system’s SSD storage provides the following level of performance:

  • 3072 IOPS per TiB
  • 768 MB/s per TiB

Each file system has a throughput capacity that determines the level of I/O. Higher levels of capacity and IOPS can be offered by adding more memory and NVMe Storage when the filesystem is created.

FSx for NetApp ONTAP provides highly available and durable storage with fully managed backups and support for Cross-Region DR.

FSx for NetApp ONTAP as a datastore is exclusively sold by Amazon Web Services (AWS) and it provides lifecycle management of the FSx for NetApp ONTAP file system (security updates, upgrades, and patches). It is going to be the right solution if you are already consuming NetApp storage on-premises as it will reduce the risks and complexity by using a familiar technology.

Integration with VMware Cloud on AWS

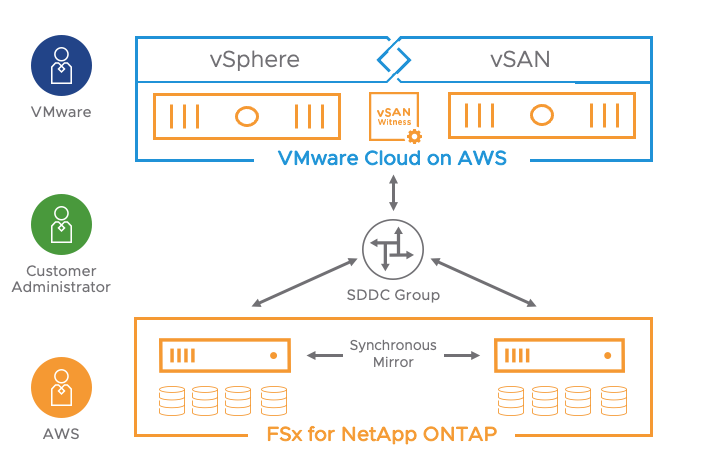
VMware Cloud on AWS integration with FSx for NetApp ONTAP is a jointly engineered option. It provides an AWS-managed external NFS datastore built on the NetApp’s ONTAP file system that can be attached to a cluster in an SDDC. Each mount point exported by the FSx on ONTAP service is going to be treated as a separate datastore.

FSxN allows for mounting up to 4 vSphere datastores through NFS in the VMC cluster. Attaching an NFS Datastore is only supported over NFS v3 protocol.

The solution can de deployed in a dedicated VPC in the following availability model:

  • Single-AZ
  • Multi-AZ

The multi-AZ deployment is designed to provide continuous availability to data in the event of an AZ failure. It leverages an active and stand-by file-system in two separate AZs where any changes are written synchronously across AZs.

When using multi-AZ deployment model, the solution leverages a floating IP address for management which enables a highly available traffic path. This is supported only over the Transit Connect (vTGW) and requires an SDDC Group to be created.

An AWS Elastic Network Interface (ENI) connects the vTGW in a newly deployed VPC where the FSx for NetApp ONTAP service will be attached.

It’s important to mention that connectivity between the ESXi hosts and the Transit Connect is not crossing the NSX Edge (Tier-0) deployed in the VMware Cloud on AWS SDDC. Each ESXi hosts ENI is attached to the Transit Connect offering a more direct connection option which is unique on the market.

More information on this architecture and its requirements is also available on the following VMware Cloud Tech Zone article: VMware Cloud on AWS integration with FSx for ONTAP.

Integrating FSxN in VMC on AWS is simple, let’s see how it goes!

Implementing FSx ONTAP in an SDDC cluster

Creating a new file system

Let’s start by creating a brand new FSx for NetApp file system in the AWS Cloud. it is accessible through the FSx menu in the AWS console.

Select Create File system from the following menu and click Next:

Select the file system type as FSxN:

Next you will have to give a name to the FSx filesystem, select wether you want it to be deployed in Single-AZ or Multi-AZ model, specify the size of the filesystem in GiB (minimum of 1024 GiB), and pick a new VPC which have to be different from the Connected VPC. It is important to note that a new VPC must be created in the same region as the SDDC to be associated with your file system.

NB: One file system can have up to 192 TB of storage.

In the next step, I have selected the “Quick Create” creation method and the following options:

This gives a recap of the different selections. To create the filesystem just click on Create File system and wait for the file system to be created.

The creation of the file system starts:

You can see the creation of a volume has started by clicking on View file system:

After a couple of minutes, you can check that the creation of the file system and associated volume is successful.

Provisioning FSx ONTAP as an NFS datastore to an SDDC

To use the FSx for NetApp ONTAP filesystem as an external storage, a VMWare Managed Transit Gateway also called Transit Connect needs to be deployed to provide connectivity with the FSx for NetApp ONTAP volumes and the ESXi hosts running in the SDDC.

SDDC need to be added to an SDDC group for the vTGW to be automatically deployed.

I have first created an SDDC Group called “FSx ONTAP” and attach my SDDC to it. Remember that SDDC Groups are a way to group SDDCs together for ease of management.

Open the VMware Cloud on AWS Console and attach the FSx for NetApp ONTAP VPC created earlier to the SDDC Group:

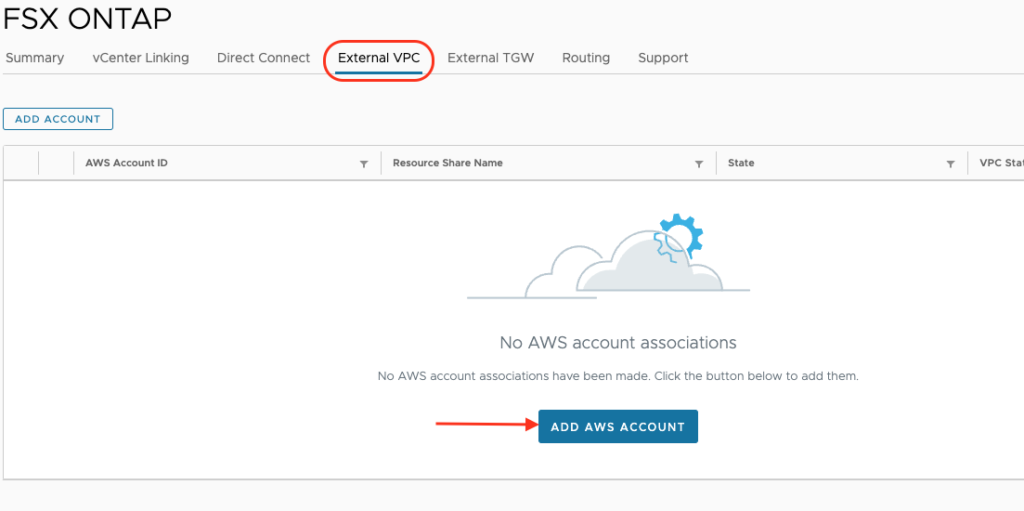
The information needed are the AWS Account ID (ID of the AWS Account where the FSx dedicated VPC resides).

After entering the ID, the process continues through the association of the account.

To finish this process, you need to switch to the target AWS Account and Accept the peering from the AWS console.

In the AWS console, open Resource Access Manager > Shared with me to accept the shared VTGW resource.

Return to the VPC Connectivity on the VMware Cloud Console and wait for the Status to change from ASSOCIATING to ASSOCIATED.

Once the Association is active, you’ll have to peer the Transit Connect with the VPC by navigating to the Transit Gateway attachments option in the VPC Menu.

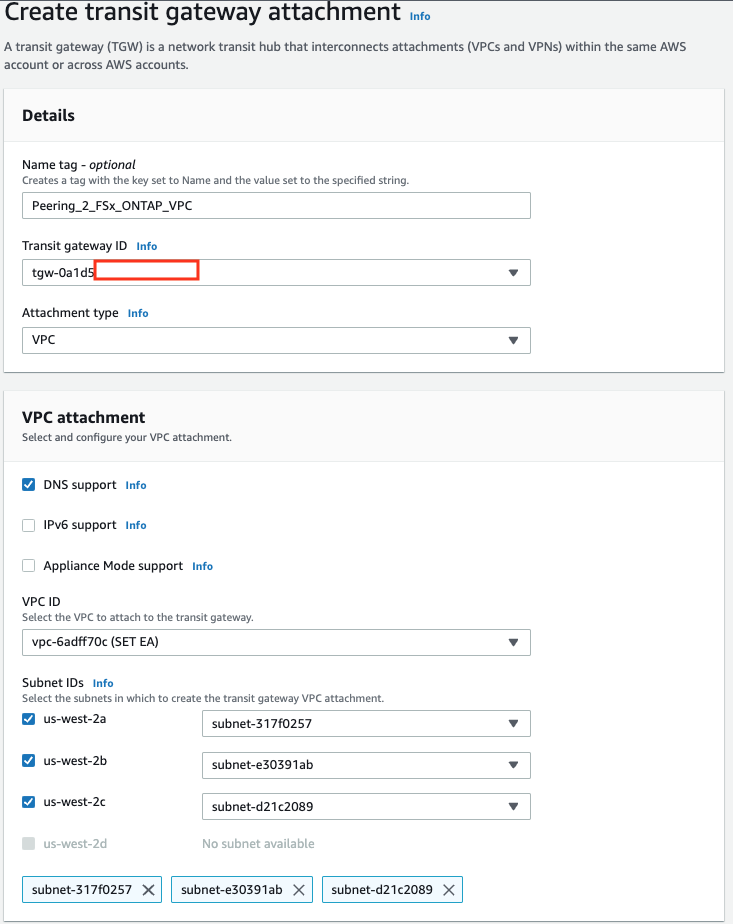
In the AWS console navigate to Transit Gateway Attachments and use the dropdown control in the Details section to select the Transit gateway ID of the vTGW.

Select the DNS support checkbox under VPC attachment, and click Create Transit Gateway Attachment

Return to the External VPC tab from the SDDC group and ACCEPT the shared Transit Gateway attachment.

Final step is to add the VPC CIDR in the Routes information of the Attachement to make it accessible from the hosts within the SDDC. The route should permit routing between SDDC group members and the FSx for NetApp ONTAP Floating IP existing in the FSx VPC.

A route back to the SDDC management CIDR need to be added in the route tables used by the FSx ONTAP deployment. Select your file system in the Files system from the Amazon FSx service page and Click the route table ID under Route tables.

You should be able to add a route by clicking on the Edit Route table button and add the Management CIDR of the SDDC with the transit Gateway as a destination:

An inbound rule in the default security group of the FSx eni should allow any traffic coming from the same Management CIDR.

Select the eni attached to the FSx for NetApp ONTAP file system you have created earlier:

Add an inbound security rule to allow access from the management CIDR:

Select All traffic type in the inbound rule

Finish by mounting the FSx datastore over NFS to the cluster in the SDDC. From the Console, open the Storage tab of the SDDC and Click ATTACH DATASTORE.

Select Attach a new datastore and fill in the IP address of the Storage Virtual Machine (SVM) of the NFS Server.

Grab the required information by clicking on the SVM ID from the Storage virtual machines tab in the FSx file system:

The IP to use is the management IP:

Terminate by mounting the NFS volume selected from the drop down menu:

You can mount an additional volume (up to four NFS datasores can be mounted on a single cluster). From the Cloud Console, you can confirm that the volumes have been mounted.

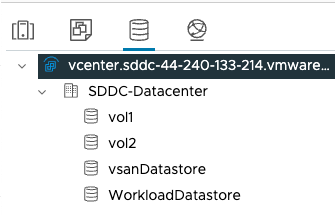
The datastore should be now reflected in the vCenter:

This concludes this post on mounting a NFS datastore from FSx for NetApp ONTAP. In the next post, I will explain you how to create a Flex Storage datastore and mount it to the SDDC.

How to leverage NATed T1 Gateway for overlapping networks over a Transit Connect

In my last post, I have showed you how to access a SDDC overlapped segment from a VPC behind a TGW attach to the SDDC through a Route Based VPN.

In this blog post, I am going to cover how to leverage the NATed T1 Gateway for connection to an overlapping segment from a VPC behind a TGW connected to my SDDC over a Transit Connect (vTGW).

There are slight differences between both configuration. The main one is that static routing in the vTGW peering attachment is used instead of dynamic routing. The second one is we will have to use route aggregation on the SDDC.

Route Summarization (eg. Aggregation)

A question, I have heard for a long time from my customers is when are we going to support route summarization. Route summarization — also known as route aggregation — is a method to minimize the number of entries in routing tables for an IP network. It consolidates selected multiple routes into a single route advertisement.

This is now possible since M18 with the concept of Route Aggregation!

Route Aggregation will summarize multiple individual CIDRs into a smaller number of advertisements. This is possible for Transit Connect, Direct Connect endpoints and the Connected VPC .

In addition, since the launch of multi CGW, it’s mandatory for CIDRs sitting behind a non default CGW to be able to advertised them.

This is going to be mandatory in this use case as I am using a NATed T1 Compute Gateway with an overlapping segments that I want to access over a DNAT rule.

Implementing the topology

SDDC Group and Transit Connect

In this evolution of the lab, I have created an SDDC Group called “Chris-SDDC-Group” and attach my SDDC to it.

If you remember well from my previous post, SDDC Groups are a way to group SDDCs together for ease of management.

Once I created the SDDC group, it has deployed a VMware Managed Transit Gateway (Transit Connect) that I have then peered to my native TGW.

I have entered the information needed including the VPC CIDR (172.20.5.0/24) that stands behind the peered TGW.

Keep in mind that the process of establishing the peering connection may take up to 10′ to complete. For more detailed information on how to setup this peering check my previous blog post here.

Creating the Route Aggregation

In order to create the route aggregation, I have had first to open the NSX UI as the setup is done over the Global configuration menu from the Networking tab which is only accessible through the UI.

I created a new aggregation prefix list called DNATSUBNET by clicking on the ADD AGGREGATION PREFIX LIST …

I have created the DNATSUBNET with the prefix 192.168.3.0/24 to advertised it over Transit Connect

with the following prefix (CIDR):

To finish, I have then created the route aggregation configuration. For that, I have first given it a name, selected the INTRANET as the endpoint, and selected the prefix list created earlier.

Checking the Advertised route over the vTGW

In order to make sure the route aggregation works well, I have verified it in both the VMC UI at the Transit Connect level on the Advertised Routes tab:

and in the SDDC group UI from the Routing tab that displays the Transit Connect (vTGW) route Table:

Adding the right Compute Gateway Firewall rule

In this case, as I am using a vTGW peering attachment, there is no need to create an additional Group with the VPC CIDR as there is an already created group called “Transit Connect External TGW Prefixes” that I can used.

I have utilized the same group with the CIDR used to hide the overlapped segment with the DNAT rule.

I then have created the Compute Gateway Firewall rule called ‘ToDNAT‘ with the group “Transit Connect External TGW Prefixes” as the source and the group “NatedCIDRs” as the destination with ‘SSH’ and ‘ICMP ALL’:

Testing the topology

Checking the routing

The routing in the VPC didn’t change. We only need to add a static route back to the SDDC NATed segment CIDR: 192.168.3.0/24

Next is to check the TGW routing table to make sure there is also a route to the SDDC Nated CIDR through the peering connection.

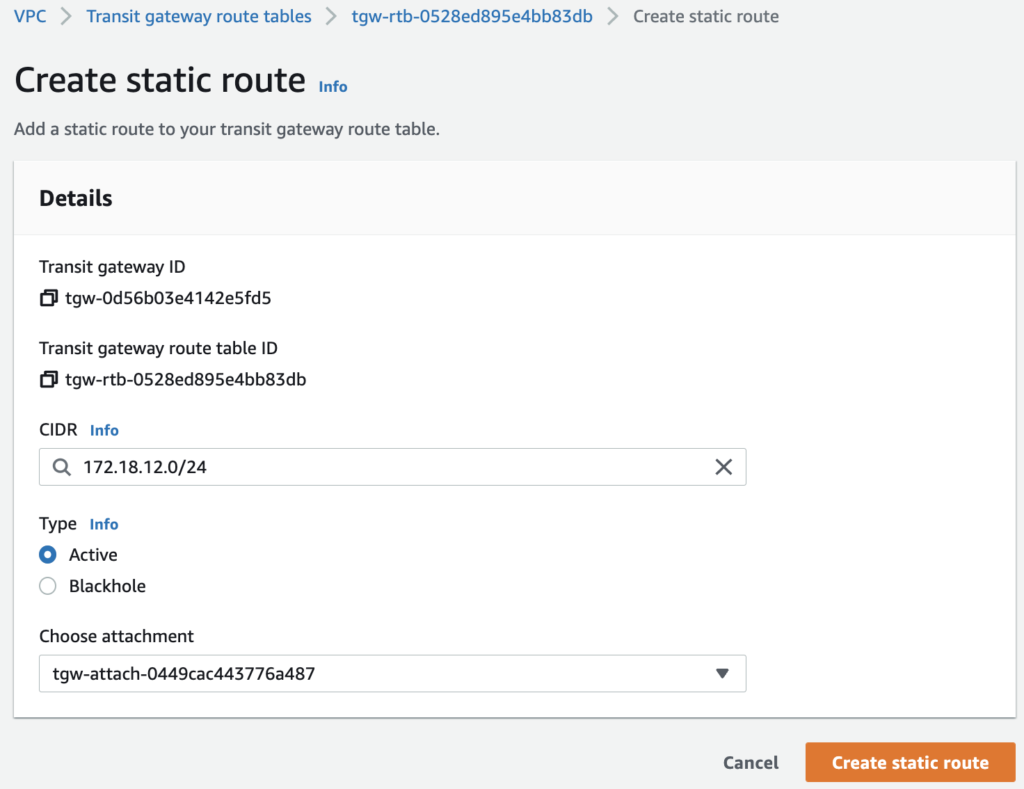
We have to add a static route with a route back to the NATed CIDR:

I confirmed there was a route in the Default Route table of the Transit Gateway:

Pinging the VM in the SDDC from the VPC

To test my lab connectivity, I have connected to the instance created in the AWS native VPC (172.20.5.0/24) and try to ping the 192.168.3.100 Ip address and it worked again!

In this blog post, I have demonstrated how to connect to an overlapped SDDC segment by creating an additional NATed T1 Compute Gateway. In this lab topology, I have tested connectivity from a native VPC behind a TGW connected to my SDDC over a Transit Connect (vTGW).

I hope you enjoyed it!

In my next blog post, I will show you how to establish a communication between a subnet in a VPC and an SDDC segment that are overlapping over a Transit Connect, stay tune!

How to leverage NATed T1 Gateway for overlapping networks over a Route Based VPN to a TGW

I have seen a lot of customers having overlapping IP subnets among their applications and who wanted to avoid renumbering their network segments when they migrate them to the cloud.

In the recent 1.18 release of VMware Cloud on AWS, we have added the ability for customers to create additional T1 Compute Gateways . Additional T1s can be used for a number of use cases including environment segmentation, multi-tenancy and overlapping IP addresses.

In this blog post, I am going to cover the specific design case where a native VPC needs to connect with a segment in an SDDC that has an overlapping subnet with another segment. The SDDC itself is using a Route Based VPN to connect to a native AWS Transit Gateway where the native VPC is peered.

Lab topology

First of all, I have deployed my SDDC in the Northern Virginia region. Straightaway I have attached it to a native Transit GW over a Route Based VPN (I wanted to leverage BGP for dynamic routes exchange).

I then have attached the native VPC to the native TGW through a normal peering connectivity.

N.B.: I took the assumption that I would need a route aggregation for route advertisement as it’s a requirement for the Multiple Compute Gateway case. A key point in that case is that it’s not using Transit Connect, Direct Connect, or Connected VPC, so I don’t need a route aggregation.

Additionally in this SDDC, I have created two Compute segments that are using overlapping IPs (172.20.2.0/24).

On the AWS native side, there is 1 EC2 instances (172.20.5.153) in a native VPC (172.20.5.0/24) and on the SDDC I have deployed a Debian10 Virtual Machine named Deb10-app001 running with IP 172.20.2.100.

Inside the SDDC, I have attached the VM to the Overlapped segment as you can see it here:

Implementing the lab topology

Creating the New CGW

There are three different types of Tier-1 Compute Gateways that can be added with M16: Routed, Isolated and NATed. In this example, I have chosen the NATed type. This CGW type allows for communication between segments but avoid that any segments to be learned by the Tier-0 router. This also avoid having their CIDRs show up in the routing table.

To create the new NATed CGW, I went to the Tier1-Gateways menu and click on the “ADD TIER-1 GATEWAY” button. In addition, I have made sure I pick NATed as the type.

I know have a new Tier-1 Compute Gateway.

Creating a new overlapping segment

Equally, I have created the overlapped segment and have attached it to the new NATed CGW Compute Gateways. I have picked the ‘T1 NATed’ CGW in the list.

Creating a DNAT Rule

In order to ensure connectivity to the SDDC’s overlay segments configured behind them we need to configure a NAT Rule on the NATed CGWs

So the last step was to create a DNAT Rule and attach it to the T1 NATed Compute Gateway.

For that I went to the NAT Menu on the left and have selected the Tier-1 Gateway tab and pick the T1 NATed GW.

I have just clicked on the ADD NAT RULE button. I have enter the NATed subnet in the destination IP/Port field (192.168.3.0/24 in this example) and the overlapped subnet as the destination.

This means that any IP I want to reach inside 172.20.2.0/24 like 172.20.2.100 will be accessible over the Nated IP 192.168.3.100.

Next step is to click on the Set to select the right T1 Gateway to apply the rule to and picked the T1 Nated Gateway:

After a couple of seconds, I have confirmed the rule gets activated by checking the rule status:

Adding the right Compute Gateway Firewall rule

Next thing I did to finish the setup is to add the right firewall rule on the new T1 Gateway. Remember each T1 has its own FW rules.

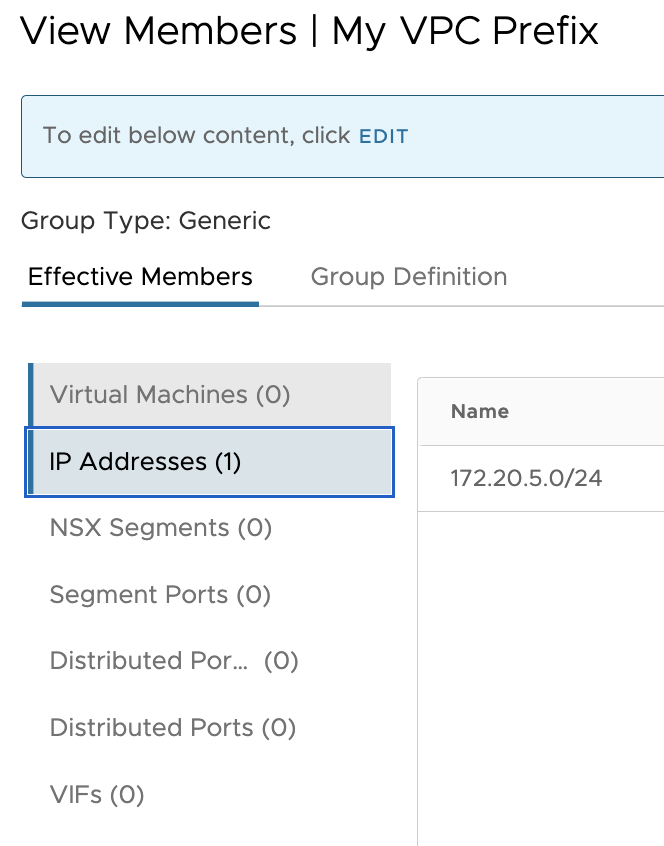
In this case, I have created a new group called ‘My VPC Prefix’.

I have, however, created another group with the CIDRs I used to map the ‘Overlapping Segment’:

The segment used in this example is 192.168.3.0/24. The group reference two CIDRs however

I then have created the Compute Gateway Firewall rule called ‘ToDNAT‘ with the group “My VPC Prefix” as the source and the IP address of my NATed segment as the destination with ‘SSH’ and ‘ICMP ALL’:

Compute Gateway FW rule have to use the NATed CIDR as Destination IP and not the segment ip.

Testing the lab topology

Checking the routing

First let’s check the routing inside the VPC. We need to add a static route back to the SDDC NATed segment CIDR: 192.168.3.0/24. Thanks to that, the VPC will send all traffic destinated to the NATed CIDR over the TGW peering.

The route back to the SDDC in the route table of the VPN/subnet

As there is a Route Based VPN between the SDDC and the TGW, the TGW route table is automatically advertising the SDDC NATed CIDR (192.168.3.0/24) that I will use to connect to the overlapped segment (172.20.2.0/24).

This shows the attached VPC CIDRs and the segment CIDRs.

Pinging from the VPC

To test my lab connectivity, I have connected to the instance created in the AWS native VPC (172.20.5.0/24) and try to ping the 192.168.3.100 Ip address and it worked!

In this blog post I have demonstrated how to connect to an overlapped SDDC segment by creating an additional NATed CGW. In this example, I have connected from a VPC attach to a TGW connected to the SDDC over a VPN .

I hope you enjoyed it!

In my next blog post, I will show you how to do the same over a Transit Connect, stay tune!

VMware Transit Connect to native Transit Gateway intra-region peering in VMware Cloud on AWS

VMware Transit ConnectTM has been around now for more than a year and I must admit that it has been widely adopted by our customers and considered as a key feature.

Over the time we have added multiple new capabilities to this feature like support for connectivity to a Transit VPC, custom real-time Metering to get more visibility on usage and billing, connectivity to an external TGW (inter region), and more recently Intra-Region Peering with AWS TGW which has been announced at AWS re:Invent 2021, also referred to as intra-region peering.

Let’s focus in this post on the specific use case of allowing connectivity from workloads running on an SDDC to a VPC sitting behind a native Transit Gateway – TGW.

Intra-Region VTGW to TGW Peering lab Topology

In this lab, I have deployed an SDDC and attached it to an SDDC Group with a vTGW (Transit Connect) that I have peered to a native TGW in the same region.

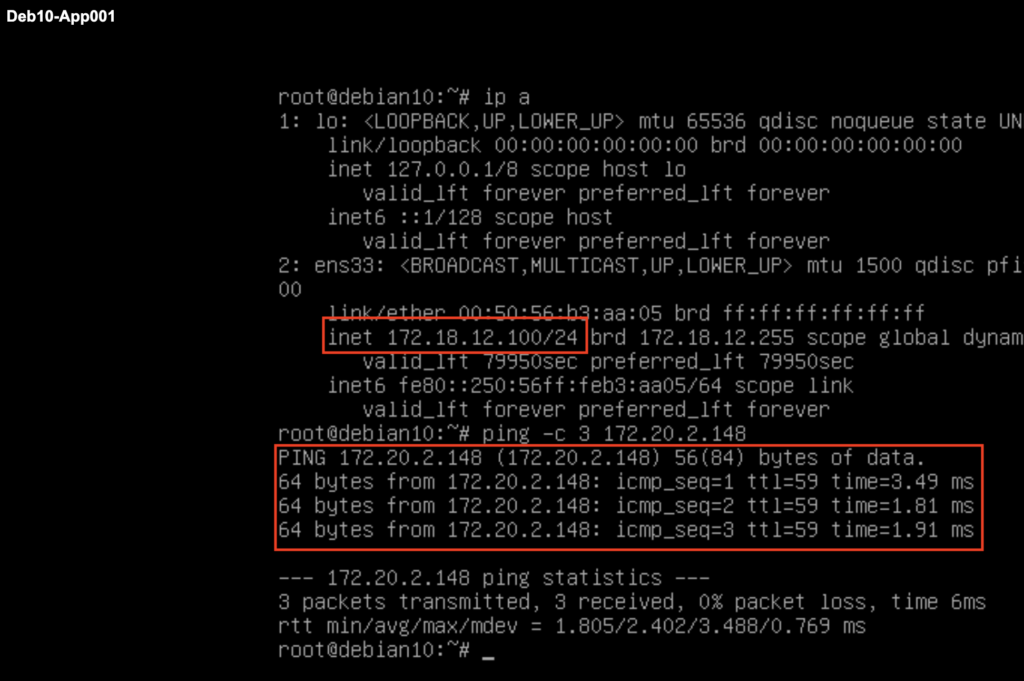
On the AWS native side, I have deployed 2 EC2 instances (172.20.2.148 and 172.20.2.185) in a native VPC (172.20.2.0/24) and on the SDDC I have deployed a Debian10 Virtual Machine named Deb10-App001 running with IP 172.18.12.100.

Building the lab Topology

Let’s see how to put all things together and build the Lab!

Attaching the native TGW to the SDDC Group

To start configuring this lab it’s very easy!

I have first created an SDDC Group called “Multi T1” and attach my SDDC to it. SDDC Groups are a way to group SDDCs together for ease of management.

Transit Connect offers high bandwidth, resilient connectivity for SDDCs into an SDDC Group.

Then I have edited my SDDC Group and selected the External TGW tab.

I have Clicked on ADD TGW. The information needed are the AWS Account ID (ID of the AWS Account where the TGW resides), and the TGW ID that I have grabbed from my AWS Account.

The TGW Location is the region where the native TGW being peered with resides. The VMC on AWS Region stands for Region where the vTGW resides.

I have entered the information needed including the VPC CIDR (172.20.2.0/24) that stands behind the peered TGW and confirmed both regions are identical.

The process of establishing the peering connection starts. Keep in mind that the whole process may take up to 10′ to complete.

After a couple of seconds the status changes to PENDING ACCEPTANCE.

Accepting the peering attachment in AWS Account

Now it’s time to switch to the target AWS Account and Accept the peering from the AWS console. This is possible by going to the Transit Gateway attachments option in the VPC Menu.

I have selected Attach in the Actions drop down Menu.

And then to Click Accept.

After a few minutes the attachment is established.

Observe the change on vTGW console

In order to validate the connection is established, I have checked the route table of the vTGW and we can see that the new destination prefix of the native VPC have been added.

We can also see from the Transit Connect menu of the SDDC that the CIDR block of the native VPC has been added to the Transit Connect routing tables in the Learned Routes.

Adding a Route in the AWS native TGW route Table

To make sure the routing will work I have checked if a routing table is attached to the peering attachment and that there are routes to the SDDC subnets.

The TGW would need the following route table:

As seen in the following screen, I can confirm there is a route table attached to the peering attachment.

If I look at the routing table content, I can find both the VPC and Peering attachement in the Associations tab.

Here are the peering in the native AWS TGW. We can see some VPNs as well as the VPC peering and vTGW peering

If I look at the Route Table of the native Transit Gateway, I can see there are only one route entry:

This is the VPC subnet propagated automatically from the peering to the native VPC (172.20.2.0/24)

As the Transit Connect does not propagate its routes to the native TGW, we need to add the route back to the CIDRs of the SDDC.

Be careful because if you forget this step it won’t be able to route the packets back to the SDDC!

After a couple of seconds, the route table is updated.

All subnets should be added if connectivity is needed to them.

Add a route back to SDDC CIDRs into the native VPC route table

By default the native VPC will not have a route back to the SDDC CIDRs, so it needs to be added manually in order to make communication between both ends possible.

Add one or all SDDC CIDRs, depending on whether you want to make all or some of the segments in the SDDC accessible from the native VPC.

I have only added one segment called App01.

NB: Virtual Machines on Layer-2 extended networks (including those with HCX MON enabled) are not able to use this path to talk with the native VPC.

Keep in mind that as you add prefixes to either the VMware Cloud on AWS or the AWS TGW topologies the various routing tables on both sides will have to be updated.

Configure Security and Test Connectivity.

Now that network connectivity has been established let’s have a look at the additional steps that need to be completed before workloads can communicate across the expanded network.

Configure Compute Gateway FW rules in SDDC

First, the Compute Gateway (CGW) Firewall in the SDDC must be configured to allow traffic between the two destinations.

You have the choice to define IP prefix ranges in the CGW to be very granular in your security policy. Another option is to use the system defined CGW Groups called ‘Transit Connect External TGW Prefixes‘ as sources and destinations in the rules.

The system defined Group is created and updated automatically and it includes all CIDRs added and removed from the VTGW. Either choice works equally well depending on your requirements.

I have created a Group will all prefixes from my SDDC called SDDC Subnets where I could find the IP address of my test VM.

I decided to configure a Compute Gateway Firewall rule (2130) to allow traffic from the App01 compute segment to the native VPC and have enforced it at the INTRANET LEVEL. The second rule (2131) will allow for connectivity from the native VPC to the SDDC subnets.

Configure Security Groups in VPC

For the access to the EC2 instance running in the native VPC, make sure you have updated the security group to make sure the right protocol is permitted.

My EC2 instance is deployed has an IP Address of 172.20.2.148

and has a security group attached to it with the following rules:

Test connectivity

It’s time to test a ping from App001 VM in my SDDC which has ip address 172.18.12.100 to the IP Address of the EC2 instance.

We can also validate that a connectivity is possible from the EC2 instance to the VM running in the SDDC.

Conclusion

Win this post blog post we have established an intra-region VTGW to TGW peering, updated route tables on both the TGW and the native VPC, prepared all security policies appropriately in both the SDDC and on the AWS side, and verified connectivity end to end. 

This intra-region peering is opening a lot of new use case and connectivity capabilities in addition to the existing Inter-region peering.

In my next post, I will show you how to peer vTGW with multiple TGW, stay tune!

NSX Traceflow in VMC on AWS for self-service traffic Troubleshooting

In a recent post I have talked about the NSX Manager Standalone UI access which was released in VMware Cloud on AWS in version 1.16.

This capability is now permitting customer to access a very useful feature called Traceflow that many NSX customers are familiar with and which allows them to troubleshoot connectivity issues in their SDDC.

What is Traceflow and how does it work?

VMware Cloud on AWS customers can leverage Traceflow to inspect the path of a packet from any source to any destination Virtual Machines running into the SDDC. In addition, Traceflow provides visibility for external communication over VMware Transit Connect or the Internet.

Traceflow allows you to inject a packet into the network and monitor its flow across the network. This flow allows you to monitor your network path and identify issues such as bottlenecks or disruptions.

Traceflow observes the marked packet as it traverses the overlay network, and each packet is monitored as it crosses the overlay network until it reaches a destination guest VM or an Edge uplink. Note that the injected marked packet is never actually delivered to the destination guest VM.

Let’s see what it can do to help gaining visibility and troubleshooting networking connectivity in a VMC on AWS SDDC.

Troubleshooting Connectivity between an SDDC and a native VPC over a vTGW/TGW.

First let’s have a look at the diagram of this lab.

In my lab, I have deployed two SDDCs: SDDC1 and SDDC2 in two different regions and have attached them together within an SDDC Group. As they are in two different region two Virtual Transit Connect are required. I have two VMs deployed in the SDDC1, Deb10-App01 (172.18.12.100) and Deb10-Web001 (172.18.11.100).

I have also deployed a native VPC (IP: 172.20.2.0/24) attached to the SDDCs group through a TGW peered to the vTGW. I then have deployed two VMs in the attached VPC with IPs 172.20.2.148 and .185.

In this example, the trafic I want to gain visibility on will flow over the vTGW (VMware Managed transit Gateway) and the native Transit GatewayTGW which is peered to it.

Peering a vTGW to a native AWS Transit Gateway is a new capability we recently introduced. We can peer them in different region as well as in same region. If you want to know more how to setup this architecture, have a look at my post where I describe the all process.

Once all connectivity is established, I have tested ping connectivity between the VM Deb10-App01 (172.18.12.100) running on a Compute segment in SDDC1 to the EC2 instance (172.20.2.148) running in the native VPC (172.20.2.0/24).

Let’s launch the Traceflow from the NSX Manager UI. After connecting to the interface, the tool is accessible under the Plan & Troubleshoot menu.

Select Source machine in SDDC

In order to gain visibility under the traffic between both VMs, I have first selected the VM in the SDDC in the left Menu which is where you can define the Source machine.

Select Destination Machine in the native VPC

In order to select the destination EC2 instance running in the native VPC, I have had to select IP – Mac/ Layer 3 instead of Virtual Machine.

Displaying and Analyzing the Results

The traceflow is ready to be started!

The Analysis start immediately after clicking on the Trace button.

After a few seconds, the results are displayed. The NSX interface graphically displays the trace route based on the parameters I set (IP address type, traffic type, source, and destination). This display page also enables you to edit the parameters, retrace the traceflow, or create a new one.

Traffic flow diagram with the hops

The screen is split into two sections.

First section, on the top, is showing the diagram with the multiple hops that was crossed by the traffic. Here we can see that the packets has first flowed over the CGW, then it has reached the Intranet Uplink of the EDGE, it hit the vTGW (Transit Connect) and it has finally crossed the native TGW.

We can see that the MAC address of the destination has been collected on the top near the Traceflow ‘title’.

The second section detailed each and every steps followed by the packets with the associated timestamps. The first column shows the number of physical Hops.

The final step show the packet has been correctly delivered to the TGW.

We can confirm that the Distributed Firewall (DFW) have been enforced and were correctly configured :

To confirm which Distributed FW rule have been enforced, you can check on the console the corresponding rule by searching it by the rule ID:

Same thing applies for the Edge Firewall for North South Trafic.

Again I have checked the Compute Gateway Firewall rule to confirm it picked the right one and that it was well configured.

Let’s now do a test with a Route Based VPN to see the difference.

Troubleshooting Connectivity between an SDDC and a TGW via a RB VPN

Now instead of using the vTGW to TGW peering, I have established a Route Based VPN directly to the native Transit GW in order to avoid flowing over the vTGW.

I have enable the RB VPN from the Console:

I have enable only the first one.

After a few minutes the BGP session is established.

The VPN Tunnel in AWS shows 8 routes have been learned in the BGP Session.

I just need to remove the static route in the native TGW route table to avoid asymmetric traffic.

The 172.18.12.0/24 where my Virtual Machine runs is now learned from the BGP session.

Let’s start the analysis agains by clicking the Retrace button.

Click on Retrace button to relaunch the analysis on the same Source and Destination

Click Proceed to start the new request.

The new traceflow request result displays.

This time the packet used the Internet Uplink and the Internet Gateway of the Shadow VPC managed by VMware where the SDDC is deployed. The observations show that packets were successfully delivered to both the NSX-Edge-0 through IPSEC and to the Internet Gateway (igw).

Troubleshooting Firewall rules

Last thing you can test with Traceflow is how to troubleshoot connectivity when a Firewall rule is blocking a packet.

For this scenario, I have changed the Compute Gateway Firewall rule to drop the packets.

I have started the request again and the result is now showing a red exclamation mark.

The reason of the Packet Dropped is a Firewall Rule

The details confirmed it was dropped by the Firewall rule and it displayed the ID of the rule.

That concludes this blog post on how to easily troubleshoot your network connectivity by leveraging the Traceflow tool from the NSX Manager UI in VMware Cloud on AWS.

Thanks for visiting my blog! If you have any questions, please leave a comment below.

Transit Gateway to RB VPN BGP Route filtering on VMC on AWS

Today I wanted to cover a topic that was recently raised by one of my customer about how to filter routes coming from a native TGW attached to an SDDC with a Route Based VPN.

There are currently no way to do it over the UI but it is possible through an API call to configure route filtering in and out with a Route Based VPN.

Let’s see how it is possible.

Route Based VPN attachment to a native Transit Gateway

First thing I have created a route based VPN from my SDDC to a native Transit Gateway running on AWS.

The Transit Gateway is itself attach to a native VPC with 172.16.0.0/16 as subnet.

Let’s have a look at the VPN configuration in the SDDC and in the native AWS side.

AWS Transit Gateway VPN configuration

There is a site to site VPN configured with one tunnel (I didn’t configure two tunnels in that example).

The TGW is currently learning the SDDC subnets (see the 5 BGP ROUTES) including the management segment.

In order to see all the learned CIDRs, I need to display the Transit Gateway route table.

SDDC VPN configuration

If we look at the VPN configuration on the SDDC side, here is the result.

And if I click the View routes here

I can see the learned routes …

The SDDC is currently learning the VPC CIDR from the TGW.

and the Advertised routes.

I can confirm that by default everything is learned and advertised.

Let’s see how to limit the propagation of the routes from the TGW or the SDDC through an API call.

Installing and Configuring Postman

Download Postman

First I have downloaded Postman from here and installed it on my Mac laptop.

First thing you need to do when you have installed Postman is to create a new free account.

Click Create Free Account and follow the steps until finishing your free registration.

This will bring you to the following page with a default Workspace.

Import VMC on AWS Collections

Next thing you need to do is to import the VMC on AWS Collections and Environments variables that are directly available from VMware in the vSphere Automation SDK for REST. The VMware vSphere Automation SDK for REST provides a client SDK that contains samples that demonstrate how to use the vSphere Automation REST API and sample code for VMC on AWS and others.

Click on the download button of the Downloads section.

This will download a zip file that you need to extract.

This is going to redirect you to a Github repo. Just click on the green button called “Code” and pick Download.

Once you have downloaded, select the two following files: VMC Environment.postman_collection.jsonandVMware Cloud on AWS APIs.postman_collection.json and Import both into your Postman workspace.

This will add the collection with different sub folders.

Configuring VMC on AWS environments in Postman

If you click on the Environments section on the Left, you can setup multiple environment variables here including the SDDC ID, ORG ID and a refresh token.

Start by generating an API token, grab the information of SDDC from CSP Console and copy them in the CURRENT VALUE column.

Add the following variables with the following values:

Configuring the VMC APIs Authentication

Once you have downloaded the VMC on AWS APIs collection, we need to configure a few parameters here.

Select the Authorization tab, and change the Type from No Auth to API Key.

Change the Value to {{access_token}}, “Add to” has to be kept as Header.

Limiting routes through API calls with Postman

Create a new Collection for NSX API Calls

Here we are going to import an existing collection that has been created by my colleague Patrick Kremer here on  Github. By the way Patrick has also an excellent post here and even if it’s not covering the exact same use case it was a lot inspirational to me. I would like also to mention another excellent content from Gilles Chekroun.

Follow the same steps as before for the VMC collections this will add the following:

The two first are useful to check the configuration and the two others are used to implement things

Authenticating to VMC API

Now we can Login to the VMC on AWS API in order to execute the relevant command to create the Prefix Lists and do the Route filtering.

In order to do so, Select Login in the Authentication folder and Click the Send button on the right.

The body of the request shows a new access token which is valid for 1799 seconds.

Creating a Prefix List

Now we need to create a prefix list in order to limit SDDC subnets to be advertised to the Transit Gateway through the BGP session of the route based VPN. Let’s say we want to limit the management subnet 10.73.118.0/23 to be accessible from the VPC. We also want to avoid that we can access the VPC (172.16.0.0/16) from the SDDC.

In order to achieve that we need to create two prefix lists, one to filter in and one to filter out.

From the Postman select Create Prefix List, give the prefix list ID a value.

I have chosen filter_mngt_subnet for the first Prefix List ID.

Next is to the body of the request.

{ "description": "This will filter the Management subnet from SDDC", "display_name": "{Filter out Management subnet}",
"id": "{{prefix-list-id}}",
"prefixes": [ { "action": "DENY", "network": "10.73.118.0/23" },
{ "action": "PERMIT", "network": "ANY" }
]}

Each prefix list need a DENY and a PERMIT ANY command to avoid blocking all traffic

Just click Send to add the Prefix List.

The result of the creation is a 200 OK.

I have created a second Prefix List in order to limit the VPC subnet from being advertised to the SDDC.

Display the Prefix Lists

Next step is to check the Prefix Lists has been created successfully by leveraging the Show BGP Prefix List command.

You should see the Prefix lists with all the already created ones.

Attaching the Prefix List to the route Filter

Now we have to attach the Prefix Lists to the BGP Neighbors configuration.

First of all grab the existing configuration by using the Show VMC T0 BGP Neighbors GET command.

The result is displayed as follow.

Copy this text and remove the following lines: _create_time, _create_user, _last_modified_time, _last_modified_user, _system_owned, _protection, _revision.

Now we are going to append the prefix Lists to the configuration by using the latest command: Attach Route Filter.

Grab the Neighbor ID from the result and paste it to the VALUE.

Copy and paste the previous result into the Body of the command and the prefix list command in an out.

Click the Send button.

Checking routes Filtering

If I check on the SDDC side I can see that the management subnet is now filtered out.

I confirmed it by checking on the AWS side in the Transit Gateway route table.

The management subnet is not displayed here

To conclude, I can also confirm that the VPC subnet is not advertised in the SDDC as I don’t see it as a learned route.

That concludes my post, enjoy filter out the routes!

NSX Manager Standalone UI for VMC on AWS

Today I want to focus on the new feature from M16 release that enable customer to have a direct access to NSX Manager UI.

This is for me an interesting capability especially because it gives access to a more familiar interface (at least for customers that already utilise NSX-T) and it also reduces the latency involved with the CSP Portal reverse proxy.

In addition, it enables the access to NSX-T TraceFlow which will be very helpful to investigate connectivity issues.

Let’s have a look at this new Standalone UI mode.

Accessing the standalone UI

There are two ways to access the NSX Manager Standalone UI in VMC on AWS:

  • Via Internet through the reverse proxy IP address of NSX Manager. No particular rule is needed on the MGW.
  • Via the private IP of NSX Manager. It’s the option you will take if you have configured a VPN or a Direct Connect. A MGW firewall rule is needed in that case.

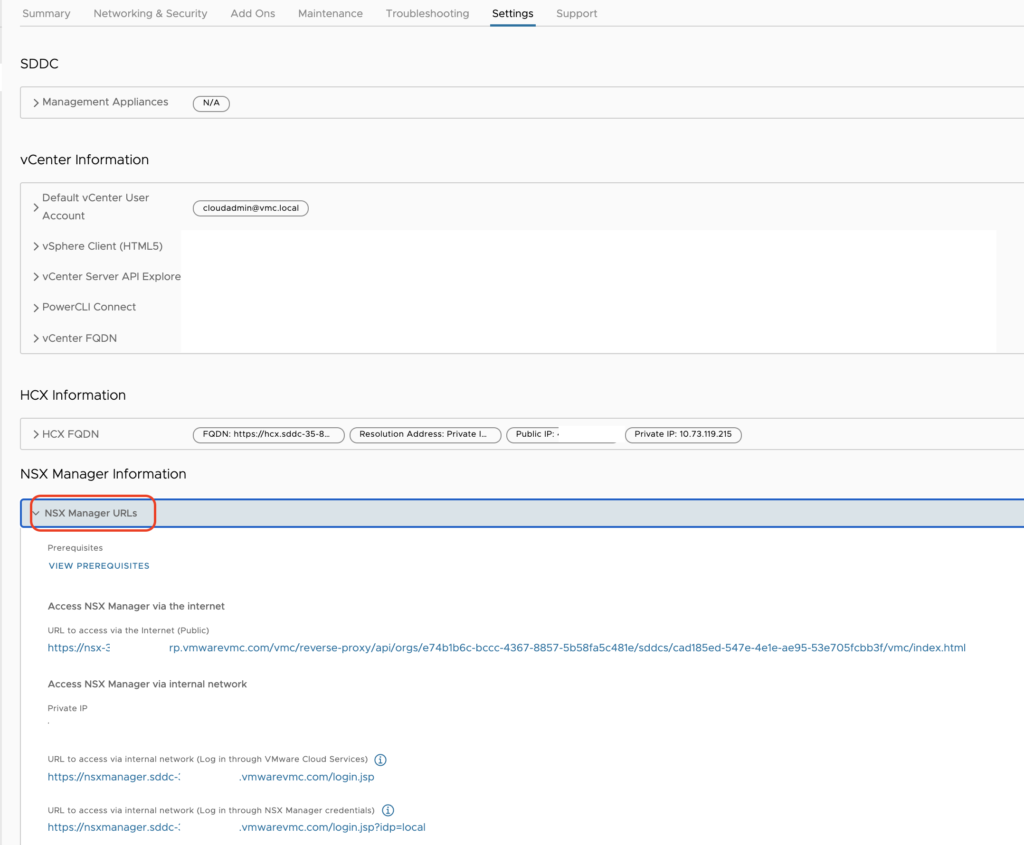
In order to choose between the type of access that fits our needs, we need to select it in the Settings tab of the VMC on AWS CSP console.

There are two ways to authenticate to the UI when leveraging the Private IP:

  • Log in through VMware Cloud Services: log in to NSX manager using your VMware Cloud on AWS credentials
  • Log in through NSX Manager credentials: log in using the credentials of the NSX Manager Admin User Account (to perform all tasks related to deployment and administration of NSX) or the NSX Manager Audit User Account (to view NSX service settings and events)

Both accounts have already been created in the backend and their user name and password are accessible below the URLs.

I have chosen the Private IP as I have established a VPN to my test SDDC.

So prior to accessing the NSX Manager, I have had to create a Management Gateway Firewall rule to allow source networks in my lab to access NSX Manager on HTTPS (the predefined group NSX Manager is used as a target).

Navigating the standalone UI

I started by clicking on the first URL here:

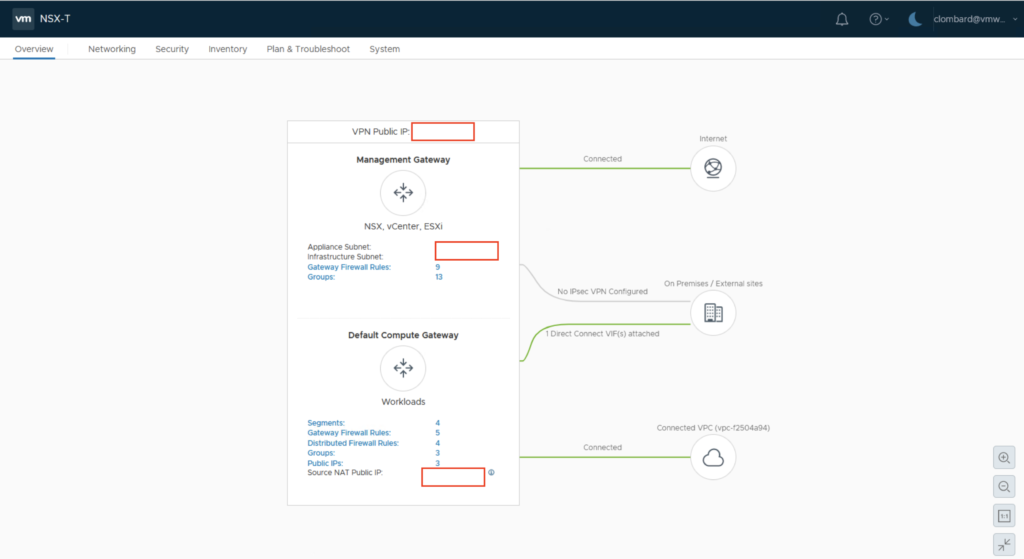
After a few seconds, I am presented with the NSX Manager UI:

Networking tab

Menu from Networking Tab

This tab will give you access to configuring the Connectivity options, Network Services, Cloud Services, IP Management, or Settings.

Basically the settings can be accessed in read only or read/write mode.

Keep in mind you will not have more rights or permissions to modify settings than if you were editing it from the CSP Console.

VPN and NAT options are accessible with same capabilities as from CSP console.

The Load Balancing options is there and is usable only if you have Tanzu activated in your cluster.

For example, for the Direct Connect you can change the ASN number or enable VPN as a backup.

For Transit Connect, you can have a look at the list of Routes Learned or Advertised.

Public IPs allow for requesting new IP addresses for using them with HCX or a NAT rule.

Let see what’s possible to do from the Segments menu.

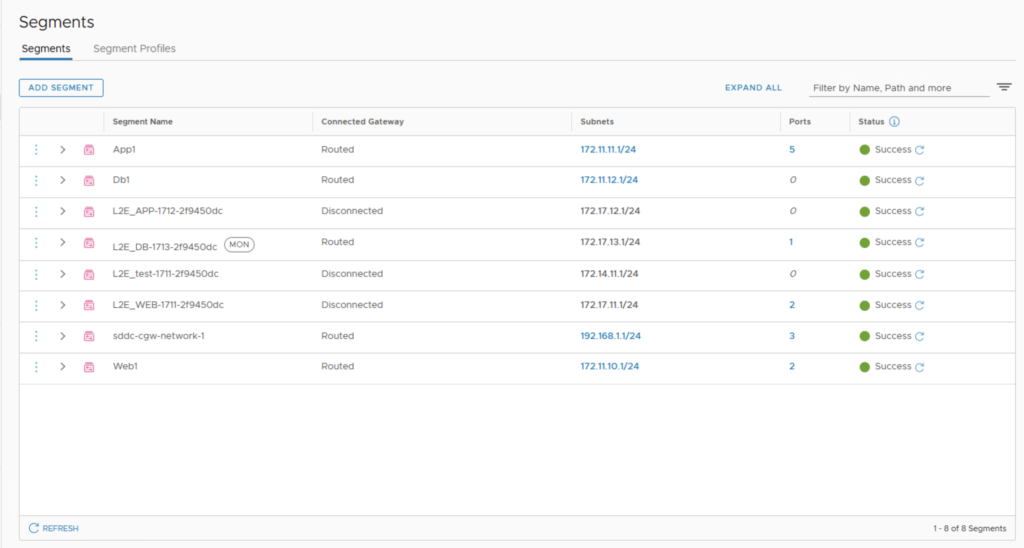
From here you can see is a list of all your segments. You can also create a new segment, modify an existing segments or delete your segments.

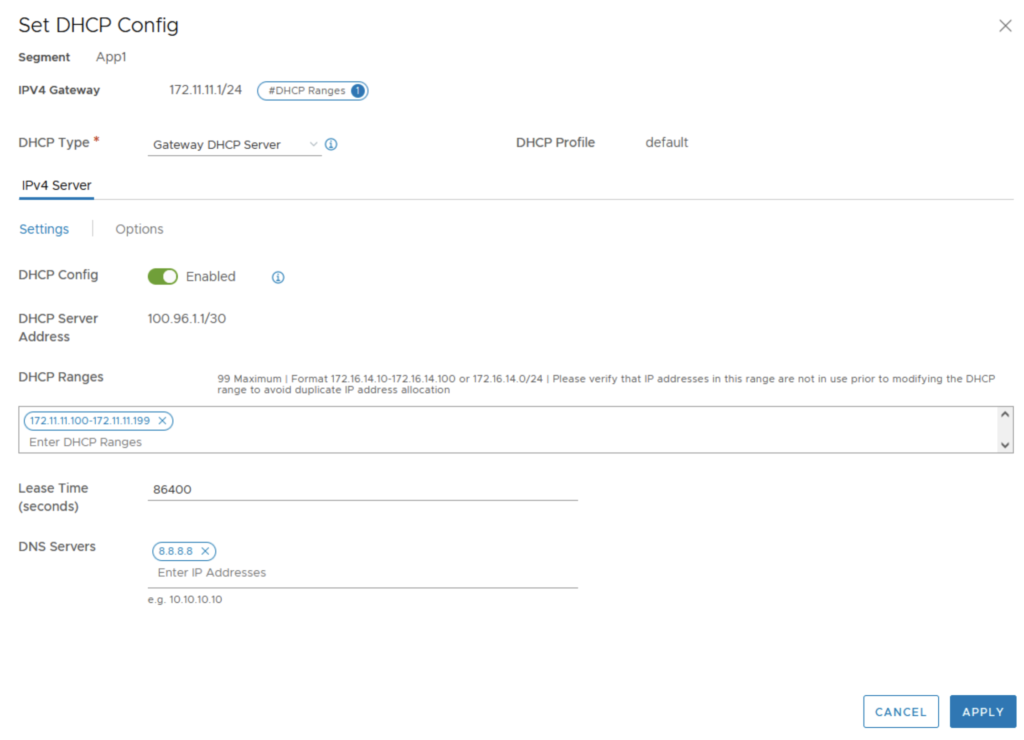
I was able to edit the settings of one of my segment DHCP configuration.

I was also able to edit my Policy Based VPN settings.

All the other options are reflecting what we can already do in the CSP Console.

Security tab

This Menu is divided into two parts:

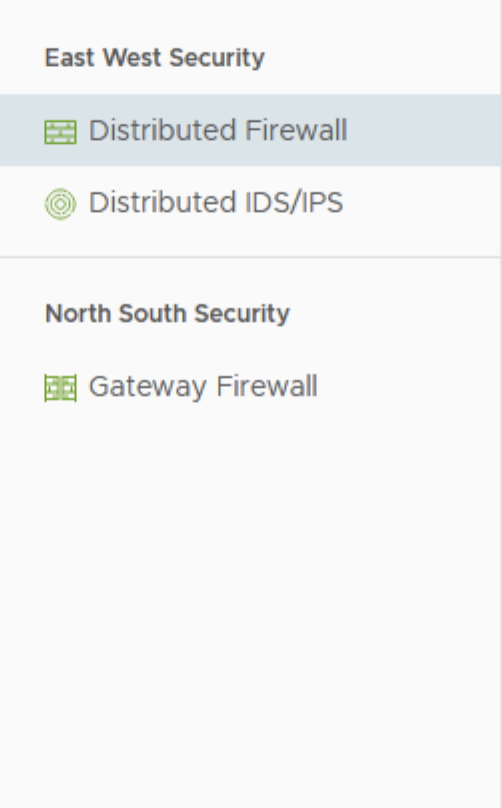
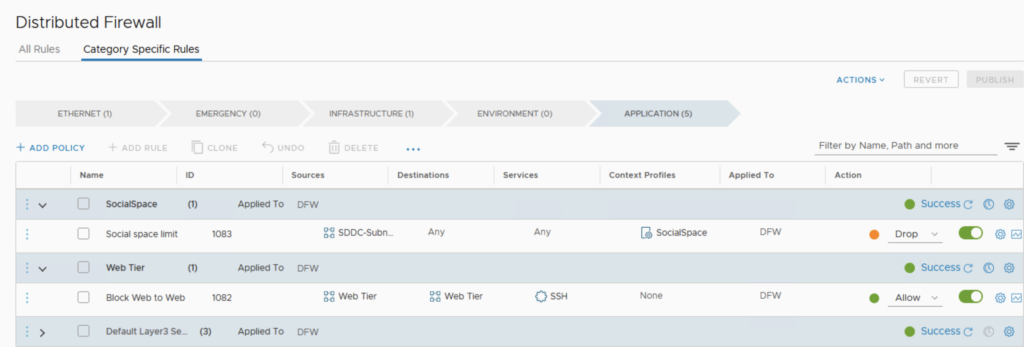
  • East-West Security that gives access to the Distributed Firewall rules and Distributed IDS/IPS configuration,
  • North-South Security covers internal traffic protection and the Gateway Firewall rules settings.

Nothing really interesting here, it’s pretty much the same as from the CSP Console as you can see here:

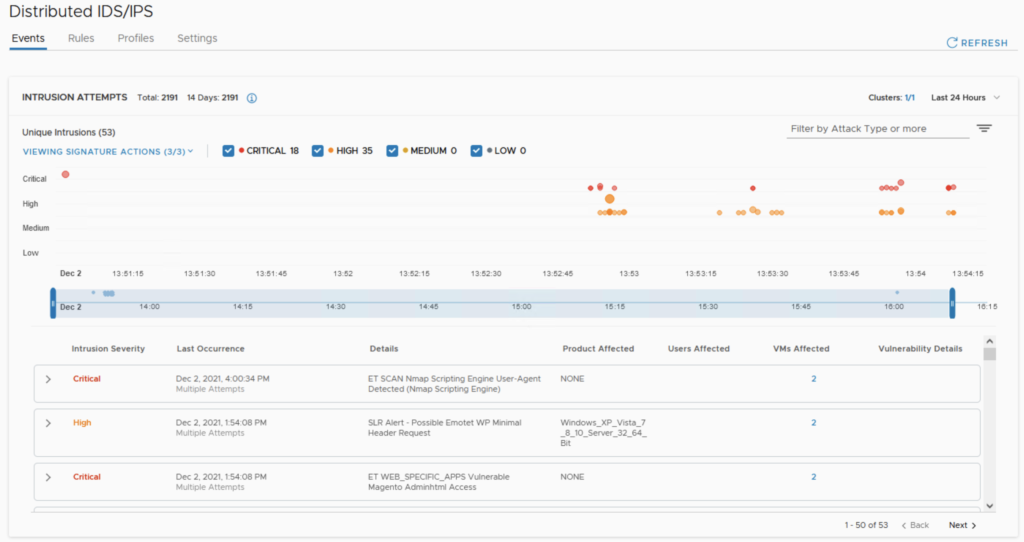
On the Distributed IDS/IPS, I can review the results of my previous penetration testing that I did in my previous post.

Inventory tab

This tab is covering:

  • Services: this where you’ll configure new protocol and services you want to leverage in the FW rules
  • Groups: group of Virtual Machines for Management FW rules and Compute Gateway rules
  • Context Profiles: you can basically add new FQDNs useful for the DFW FQDN filtering feature, AppIDs for Context Aware Firewall rule, and set up Context Profiles.
  • Virtual Machines: list all the VMs running an attached to segments with their status (Stopped, Running, …)
  • Containers: will show Namespaces and Tanzu Clusters.

Plan and Troubleshoot tab

The tab is covering:

  • IPFIX: this where you’ll configure new protocol and services you want to leverage in the FW rules
  • Port Mirroring: this permits to setup a target collector VM and then replicate and redirect all trafic from a logical port switch to it for analysis purpose
  • Traceflow: very nice feature to monitor and trouble shoot a trafic flow between two VMs and to analyze the path of the trafic flow.

The last one is a feature not existing on the current VMC on AWS CSP Console and which is to my opinion worth having a look at.
Traceflow option

Let’s have a look more deeply into what this brings onto the table in my next post.

Stay tune!