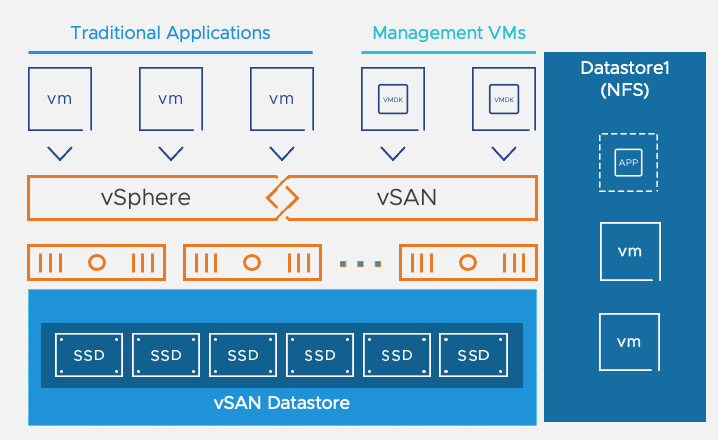
VMware Cloud on AWS relies on vSAN Storage, VMware’s software-defined storage solution, for all data storage requirements. vSAN provides a distributed storage within each cluster in the SDDC which size depends on the instance model.
By default, each vSAN clusters in an SDDC expose two datastores that are usable to store both management VMs (exclusively used by VMware) and Production workloads.
Traditionally, the cluster storage capacity (and data redundancy) scale with the number of nodes in the SDDC. However, there are certain scenarios that require additional storage but not the associated cost of adding additional compute nodes. With these ‘storage-heavy’ scenarios, a more optimal TCO can be met by reducing the number of hosts while leveraging an external cloud storage solution.
There are currently two options to add an external NFS storage to a VMware Cloud on AWS SDDC cluster:
VMware Cloud on AWS support adding external storage starting with version 1.20. A the time of this writing, adding an external storage is only supported with Standard (non-stretched) Clusters.
In this blog post I am going to cover the first option.
FSx for NetApp ONTAP solution
FSx for NetApp ONTAP is a variant of the already existing Amazon FSxTM based on the NetApp ONTAP storage operating system.
The solution itself offers the capability to launch and run a fully managed ONTAP file systems in the AWS Cloud. This file system offers a high-performance SSD file storage (with sub-millisecond latency) that can be used by many OS like Windows or Linux.
One big advantages in the context of VMware Cloud on AWS is that it fully supports the existing NetApp SnapMirror replication solution to easily replicate or migrate existing on-premises data from ONTAP deployments to the AWS Cloud. It also supports the FexClone feature which allows for instantaneously creating a clone of the volumes in your file system.
Multiple protocol are supported to access the Filesystem like NFS, SMB or iSCSI (for shared block storage). Using it as a new datastore to VMware Cloud on AWS requires to use the NFS protocol.
Each filesystem is delivered with two tiers of storage: primary storage (with SSD levels of performance) and capacity pool storage (using a fully elastic storage that scale to petabytes) with automated tiering to reduce costs.
Each FSx file system can offer multiple GB/s of throughput and hundreds of thousands of IOPS.
By default, a file system’s SSD storage provides the following level of performance:
- 3072 IOPS per TiB
- 768 MB/s per TiB
Each file system has a throughput capacity that determines the level of I/O. Higher levels of capacity and IOPS can be offered by adding more memory and NVMe Storage when the filesystem is created.
FSx for NetApp ONTAP provides highly available and durable storage with fully managed backups and support for Cross-Region DR.
FSx for NetApp ONTAP as a datastore is exclusively sold by Amazon Web Services (AWS) and it provides lifecycle management of the FSx for NetApp ONTAP file system (security updates, upgrades, and patches). It is going to be the right solution if you are already consuming NetApp storage on-premises as it will reduce the risks and complexity by using a familiar technology.
Integration with VMware Cloud on AWS
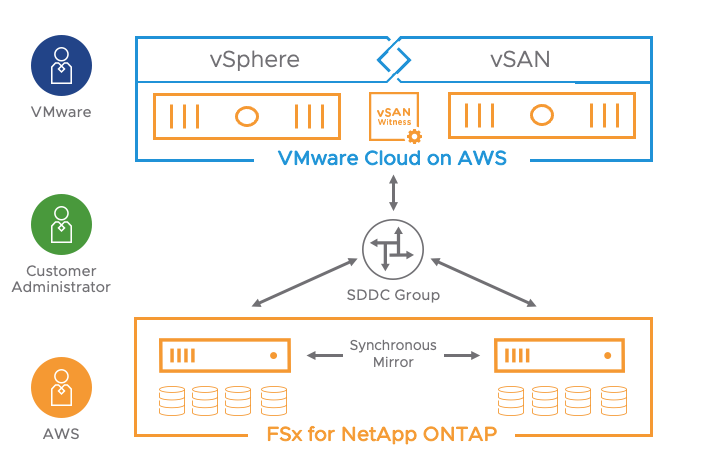
VMware Cloud on AWS integration with FSx for NetApp ONTAP is a jointly engineered option. It provides an AWS-managed external NFS datastore built on the NetApp’s ONTAP file system that can be attached to a cluster in an SDDC. Each mount point exported by the FSx on ONTAP service is going to be treated as a separate datastore.
FSxN allows for mounting up to 4 vSphere datastores through NFS in the VMC cluster. Attaching an NFS Datastore is only supported over NFS v3 protocol.
The solution can de deployed in a dedicated VPC in the following availability model:
- Single-AZ
- Multi-AZ
The multi-AZ deployment is designed to provide continuous availability to data in the event of an AZ failure. It leverages an active and stand-by file-system in two separate AZs where any changes are written synchronously across AZs.

When using multi-AZ deployment model, the solution leverages a floating IP address for management which enables a highly available traffic path. This is supported only over the Transit Connect (vTGW) and requires an SDDC Group to be created.
An AWS Elastic Network Interface (ENI) connects the vTGW in a newly deployed VPC where the FSx for NetApp ONTAP service will be attached.
It’s important to mention that connectivity between the ESXi hosts and the Transit Connect is not crossing the NSX Edge (Tier-0) deployed in the VMware Cloud on AWS SDDC. Each ESXi hosts ENI is attached to the Transit Connect offering a more direct connection option which is unique on the market.
More information on this architecture and its requirements is also available on the following VMware Cloud Tech Zone article: VMware Cloud on AWS integration with FSx for ONTAP.
Integrating FSxN in VMC on AWS is simple, let’s see how it goes!
Implementing FSx ONTAP in an SDDC cluster
Creating a new file system
Let’s start by creating a brand new FSx for NetApp file system in the AWS Cloud. it is accessible through the FSx menu in the AWS console.
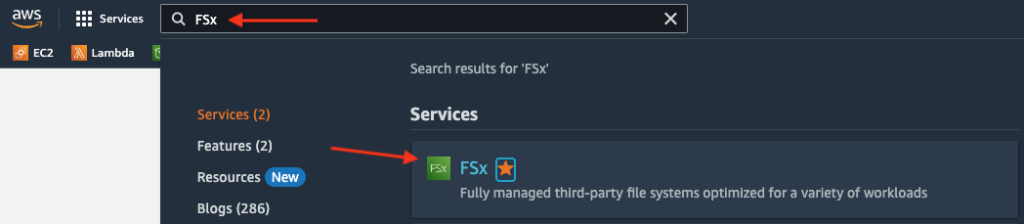
Select Create File system from the following menu and click Next:

Select the file system type as FSxN:

Next you will have to give a name to the FSx filesystem, select wether you want it to be deployed in Single-AZ or Multi-AZ model, specify the size of the filesystem in GiB (minimum of 1024 GiB), and pick a new VPC which have to be different from the Connected VPC. It is important to note that a new VPC must be created in the same region as the SDDC to be associated with your file system.
NB: One file system can have up to 192 TB of storage.
In the next step, I have selected the “Quick Create” creation method and the following options:

This gives a recap of the different selections. To create the filesystem just click on Create File system and wait for the file system to be created.

The creation of the file system starts:

You can see the creation of a volume has started by clicking on View file system:

After a couple of minutes, you can check that the creation of the file system and associated volume is successful.

Provisioning FSx ONTAP as an NFS datastore to an SDDC
To use the FSx for NetApp ONTAP filesystem as an external storage, a VMWare Managed Transit Gateway also called Transit Connect needs to be deployed to provide connectivity with the FSx for NetApp ONTAP volumes and the ESXi hosts running in the SDDC.
SDDC need to be added to an SDDC group for the vTGW to be automatically deployed.
I have first created an SDDC Group called “FSx ONTAP” and attach my SDDC to it. Remember that SDDC Groups are a way to group SDDCs together for ease of management.

Open the VMware Cloud on AWS Console and attach the FSx for NetApp ONTAP VPC created earlier to the SDDC Group:
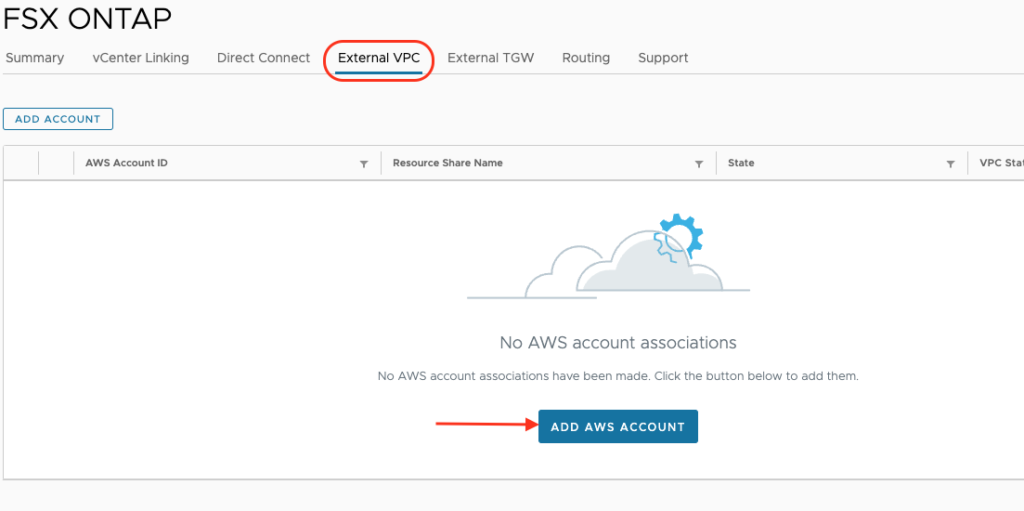
The information needed are the AWS Account ID (ID of the AWS Account where the FSx dedicated VPC resides).

After entering the ID, the process continues through the association of the account.

To finish this process, you need to switch to the target AWS Account and Accept the peering from the AWS console.
In the AWS console, open Resource Access Manager > Shared with me to accept the shared VTGW resource.

Return to the VPC Connectivity on the VMware Cloud Console and wait for the Status to change from ASSOCIATING to ASSOCIATED.

Once the Association is active, you’ll have to peer the Transit Connect with the VPC by navigating to the Transit Gateway attachments option in the VPC Menu.
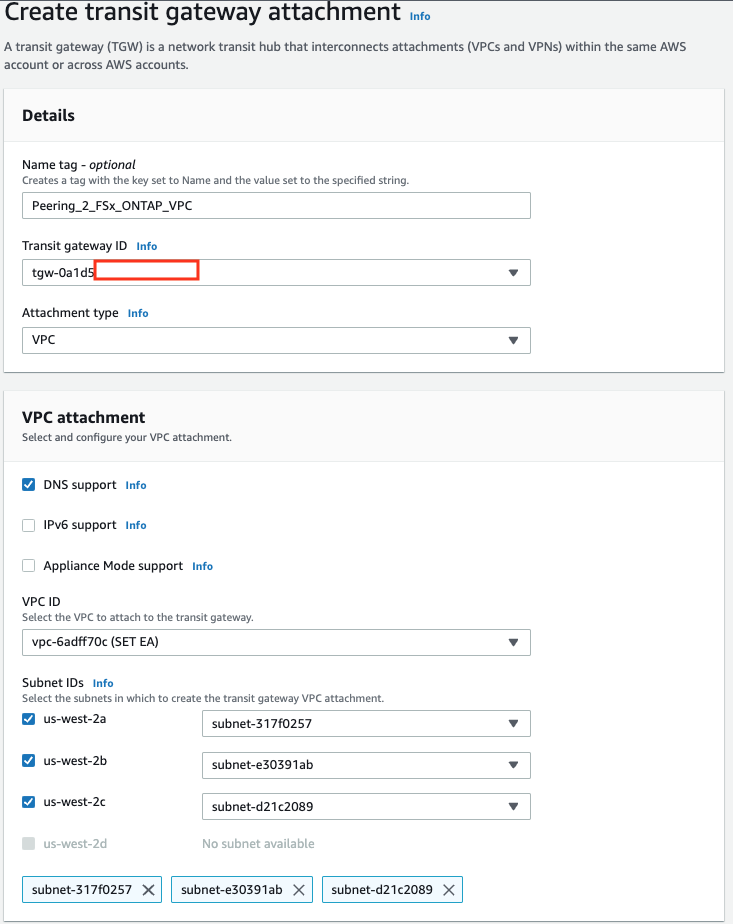
In the AWS console navigate to Transit Gateway Attachments and use the dropdown control in the Details section to select the Transit gateway ID of the vTGW.
Select the DNS support checkbox under VPC attachment, and click Create Transit Gateway Attachment.
Return to the External VPC tab from the SDDC group and ACCEPT the shared Transit Gateway attachment.

Final step is to add the VPC CIDR in the Routes information of the Attachement to make it accessible from the hosts within the SDDC. The route should permit routing between SDDC group members and the FSx for NetApp ONTAP Floating IP existing in the FSx VPC.

A route back to the SDDC management CIDR need to be added in the route tables used by the FSx ONTAP deployment. Select your file system in the Files system from the Amazon FSx service page and Click the route table ID under Route tables.

You should be able to add a route by clicking on the Edit Route table button and add the Management CIDR of the SDDC with the transit Gateway as a destination:

An inbound rule in the default security group of the FSx eni should allow any traffic coming from the same Management CIDR.
Select the eni attached to the FSx for NetApp ONTAP file system you have created earlier:

Add an inbound security rule to allow access from the management CIDR:

Finish by mounting the FSx datastore over NFS to the cluster in the SDDC. From the Console, open the Storage tab of the SDDC and Click ATTACH DATASTORE.

Select Attach a new datastore and fill in the IP address of the Storage Virtual Machine (SVM) of the NFS Server.
Grab the required information by clicking on the SVM ID from the Storage virtual machines tab in the FSx file system:

The IP to use is the management IP:

Terminate by mounting the NFS volume selected from the drop down menu:

You can mount an additional volume (up to four NFS datasores can be mounted on a single cluster). From the Cloud Console, you can confirm that the volumes have been mounted.

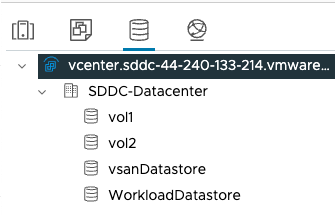
The datastore should be now reflected in the vCenter:
This concludes this post on mounting a NFS datastore from FSx for NetApp ONTAP. In the next post, I will explain you how to create a Flex Storage datastore and mount it to the SDDC.
2 thoughts on “Leveraging NFS storage in VMware Cloud on AWS – Part 1 (FSx for NetApp)”