NSX Advanced Firewall Add On for VMware Cloud on AWS (Part 2)

In my previous post, I have introduced you to the new Advanced Firewall Add-on in VMWare Cloud on AWS.

I also covered the Context Aware Firewall feature to filter connection based on the App id and not only the protocol number.

In this post, I am going to cover Distributed FW FQDN filtering to allow applications that communicate outside the SDDC gain layer 7 protection.

Introducing the FQDN Filtering feature

This feature can allow users to only access specific domains by whitelisting and/or blacklisting FQDNs. In many high-security environments, outgoing traffic is filtered using the Distributed firewall. When you want to access an external service, you usually create IP-based firewall rules. In some cases, you don’t know which IP addresses hide behind a domain. This is where domain filters come in handy.

Because NSX-T Data Center uses DNS Snooping to obtain a mapping between the IP address and the FQDN, you must set up a DNS rule first, and then the FQDN allowlist or denylist rule below it.

SpoofGuard should be enabled across the switch on all logical ports to protect against the risk of DNS spoofing attacks. A DNS spoofing attack is when a malicious VM can inject spoofed DNS responses to redirect traffic to malicious endpoints or bypass the firewall

You can define specific FQDNs that are allowed and apply them to DFW policies. Conversely, you can define specific FQDNs that are denied access to applications in the SDDC. The DFW maintains the context of VMs when they migrate. You can then increasingly rely on application profiling and FQDN filtering to reduce the attack surface of their applications to designated protocols and destinations.

Configuring DFW with FQDN filtering

In this section, I will show you how to setup a FQDN Context Profile, and a Firewall policy to limit access to specific URLs from VMs.

Creating a FQDN Context Profile.

First thing first ! Let’s create the context Profile.

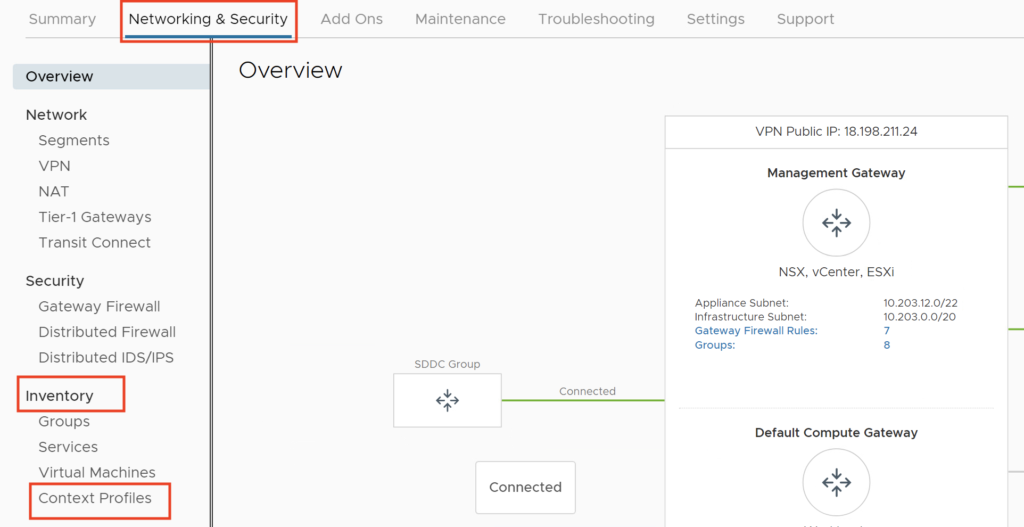
Under Networking and Security, in the Inventory section, click Context Profile.
Click FQDNs Tab
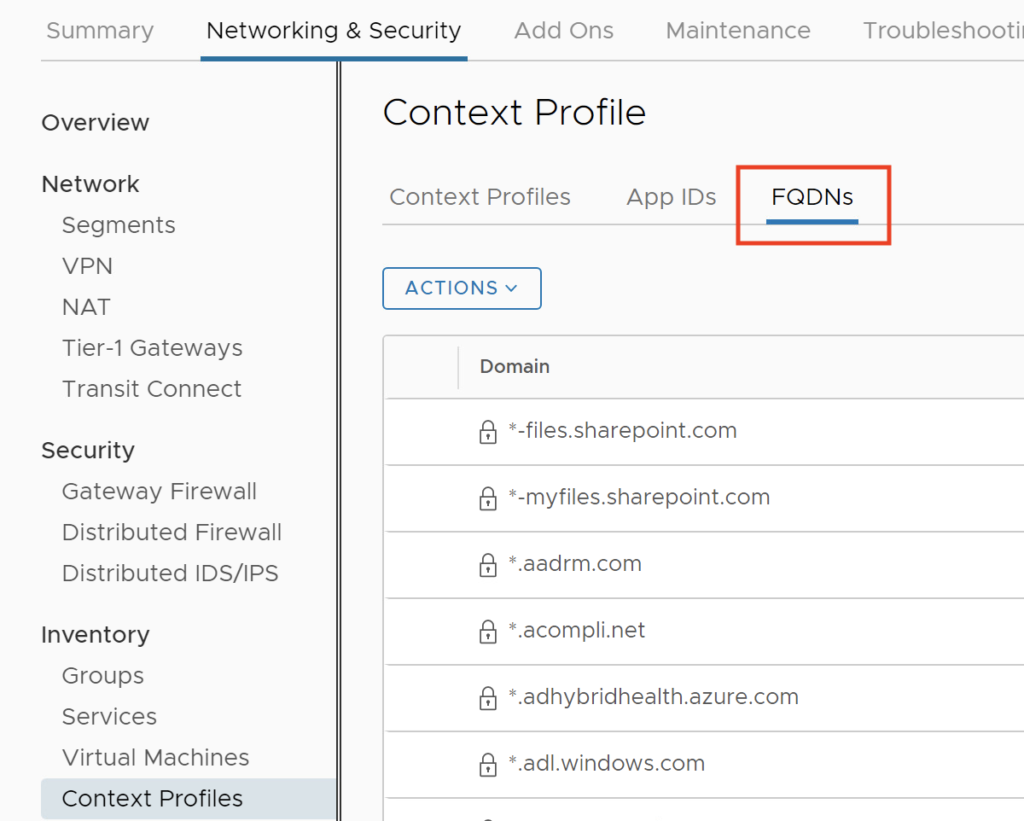
Click ACTIONS –> Add FQDN
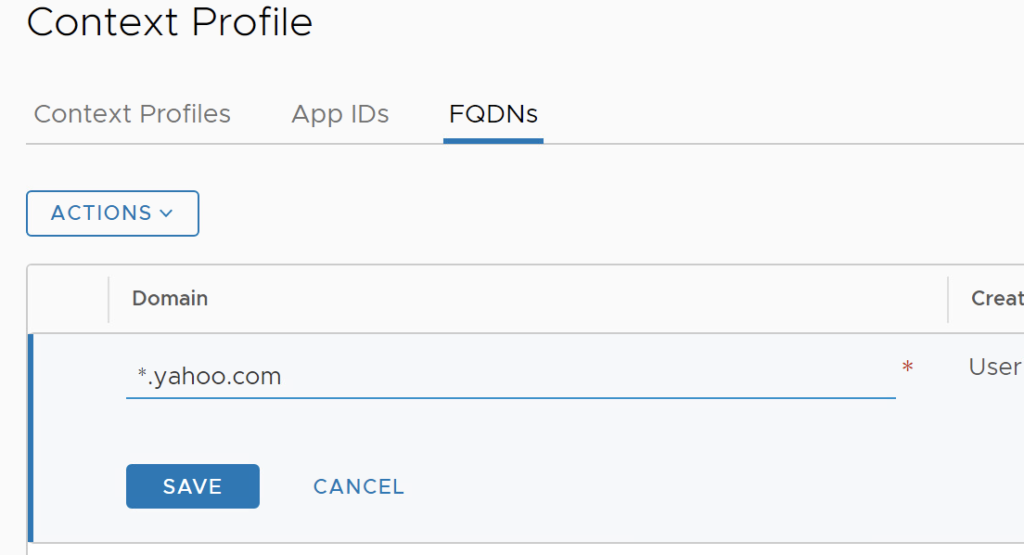
Enter the Domain: *.yahoo.com, and then Click SAVE.

Create a second FQDN with *.google.com.

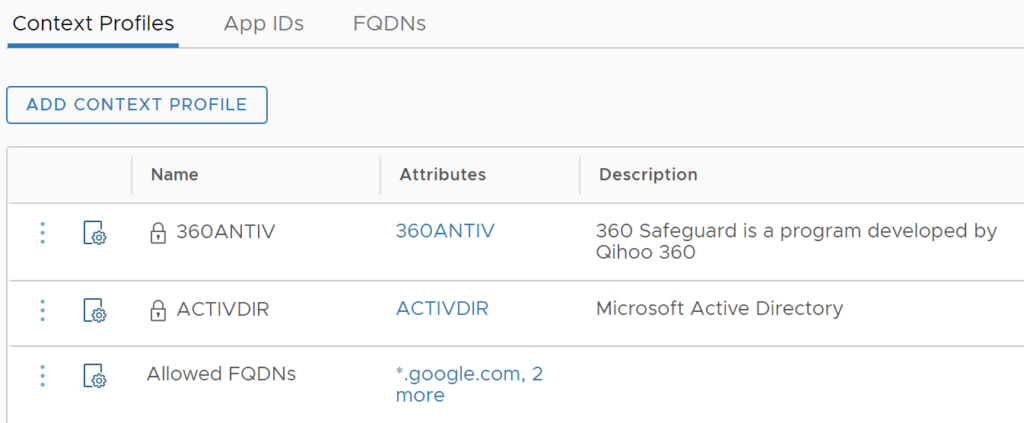
Click the Context Profile Tab, and Click ADD CONTEXT PROFILE

Give it a Name: Allowed FQDNs, Click Set

Click ADD ATTRIBUTE –> Domain(FQDN) Name

Select the following domains: *.yahoo.com, *.office.com, *.google.com and Click ADD.

Click APPLY, Click SAVE. We now have a Context Profile setup.
Creating a Firewall rule and a Policy

I have created a Group called MyDesktops which includes a segment with my Windows VMs.
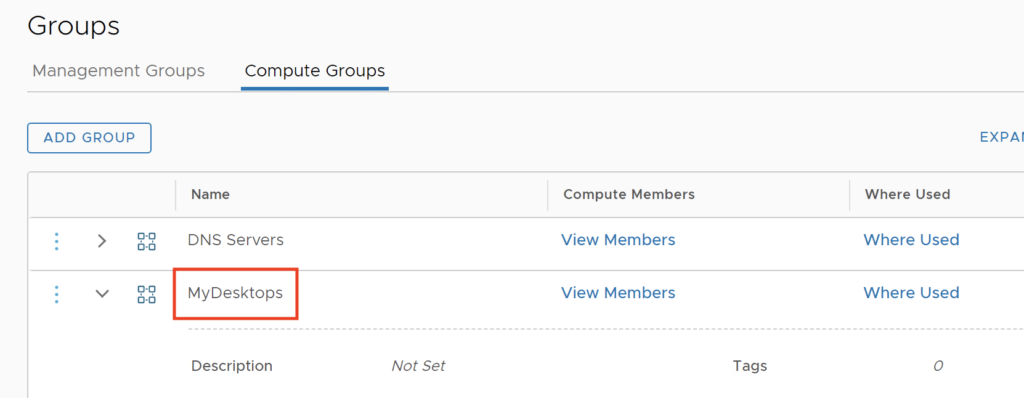
Now I am going to setup a Firewall Policy including this Context Profile. I will limit my VM in the MyDesktops group to access to the Allowed FQDNs. Also I limit access from this Group of VMs to specific DNS servers (8.8.8.8, 8.8.4.4).

I also add a Drop rule at the end to limit access to only the FQDNs that were whitelisted.

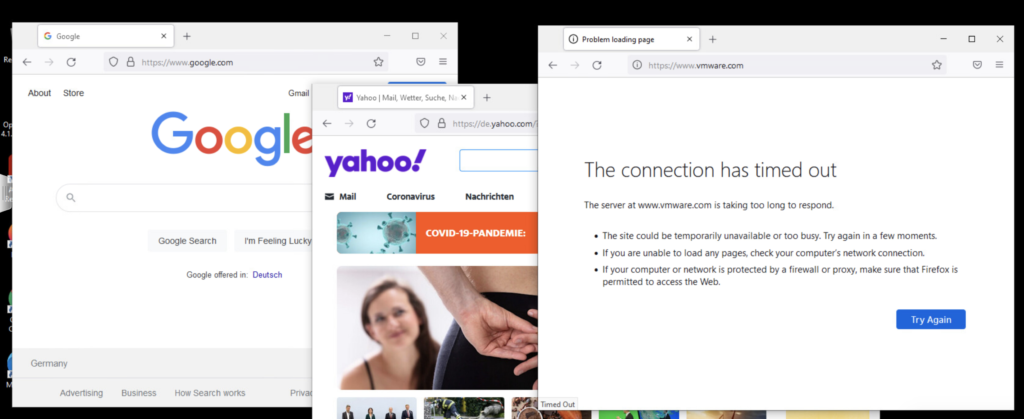
Now I am allowed to access google.com and Yahoo.com but I can’t connect anymore to the vmware.com site.
This concludes the post on FQDN Filtering. In my final post, I will cover the Distributed IDS/IPS feature.
NSX Advanced Firewall Add On for VMware Cloud on AWS (Part 1)

VMware Cloud on AWS already offers a robust sets of networking and security capabilities that enable customers to run production applications securely in the cloud.

The release of the M16 version is introducing new Advanced Firewall Features as an Add-on.

This includes the following new security capabilities:

  • L7 Distributed (Context Aware) Firewall with application ID – With L7 (Context-aware) firewall you can go beyond simple IP/ port level layer 4 security to complete stateful layer 7 controls and filtering.
  • L7 Distributed Firewall with FQDN Filtering – Applications that communicate outside the SDDC also gain layer 7 protection using Distributed Firewall FQDN filtering capability. Customers can define specific FQDNs you can define specific FQDNs that are denied access to applications in the SDDC. The DFW maintains the context of VMs when they migrate. Customers increasingly rely on application profiling and FQDN filtering to reduce the attack surface of their applications to designated protocols and destinations.
  • User Identity Firewall – You can create groups based on User ID and define DFW rules to control access to virtual desktops and applications in the SDDC. Per user/ user session access control limits the amount of time and exposure users have to desktops or applications. Integration with Active Directory / LDAP enables the DFW to continuously curate user access to applications. User ID based rules are enforced by the DFW at the source, delivering pervasive, intrinsic security throughout the SDDC.
  • Distributed IDS/IPS – With NSX Distributed IDS/ IPS, customers gain protection against attempts to exploit vulnerabilities in workloads on VMware Cloud on AWS. Distributed IDS/ IPS is an application-aware deep packet inspection engine that can examine and protect traffic inside the SDDC.

Let’s try them to see how it works!

Enabling the NSX Advanced Firewall Add-On

The NSX Advanced Firewall Add-on adds Layer-7 Firewall protection, Identity Firewalling, Distributed IDS/IPS and FQDN Filtering to the VMC on AWS SDDC. This Feature is an Add-on featured and priced in addition to the Standard VMC on AWS subscription.

Before any of these features can be used, you must first enable the add-on onto your SDDC. In the following section, I am going to walk you through the steps of enabling the NSX Advanced Firewall functionality onto your SDDC.

  1. On your SDDC tile, click View Details
  2. Click the Add-Ons tab
  3. In the NSX Advanced Firewall Tile, click Activate

Click Activate

Click OPEN NSX ADVANCED FIREWALL (This will take you to the Networking & Security Tab)

At this step, the NSX Advanced Firewall Addon has been enabled. To make use of the functionality it provides, you must configure them individually.

In the upcoming sections, we will configure and test each of these features.

Configuring L7 Distributed Context Aware Firewall

With L7 (Context-aware) firewall, it’s possible to go beyond simple IP/ port level layer 4 security to complete stateful layer 7 controls and filtering. This will avoid for instance someone from changing Port number to bypass a firewall rule.

Extremely powerful !

Deep packet inspection (DPI) built into the Distributed Firewall enables you to allow only the intended application / protocols to run, while denying all other traffic at the source. This enables you to isolate sensitive applications by creating virtual zones within the SDDC.

Distributed Firewall (DFW) layer 7 policies are enforced at the hypervisor (vNIC) level and can migrate with the VM when they move from host to host in the SDDC, ensuring there are no gaps in enforcement.

Let’s see how to configure and use the feature.

Configuring a standard L4 FW rule

In my example, I have two VMs (webserver01, webserver02) running in my SDDC which are part of a group called Web Tier.

Here are the IPs of the VMS:

They can communicate together over any protocol as this is the default settings in the Distributed Firewall as we can see here:

First let’s create a traditional L4 firewall rule to block SSH traffic between the two VMS.

Now if I want to ssh from webserver01 to webserver02 it’s blocked:

What if SSH was listening on another port, however? What if some nefarious person (knowing SSH on port 22 is being blocked) changed the port the server listens on and attempts to SSH to the server against this new port, what happens then? 

To do that I have edited the sshd_config on the webserver02 VM and changed the port to 2222:

I have then restarted the ssh service on the VM:

We can see the ssh server is now running on port 2222:

Let see what happens when we apply context awareness to the firewall rule.

now if I try to connect back but on port 2222, it works!

Unfortunately, the L4 DFW doesn’t block it. As mentioned earlier the firewall is looking for SSH on port 22, not port 2222, so I was able to bypass the firewall policy.

Configuring Context Aware Firewall rule

NSX Context-Aware Firewall  Rule (L7) enhances visibility at the application level and helps to override the problem of application permeability. Visibility at the application layer helps you to monitor the workloads better from a resource, compliance, and security point of view.

In order to switch to the Context Aware firewall, I just have to remove the SSH in the Service field from the DFW rule and need to add SSH in the Context Profile field:

The rule is now changed:

Let’s try to connect again to port 2222:

Now the attempt to connect to the modified port is block. That’s much better! This is because the DFW now assesses the packet at layer 7 and identifies the heuristics of the packet to be ssh and does not allow the traffic through.

With Context-Aware Firewalling you can enable enforcement of security protocol versions/ciphers reduce attacks by only allowing traffic matching APP Fingerprint, and enforce port-independent rules.

In the next post I will introduce you to the L7 Distributed Firewall with FQDN Filtering. Stay tune!